
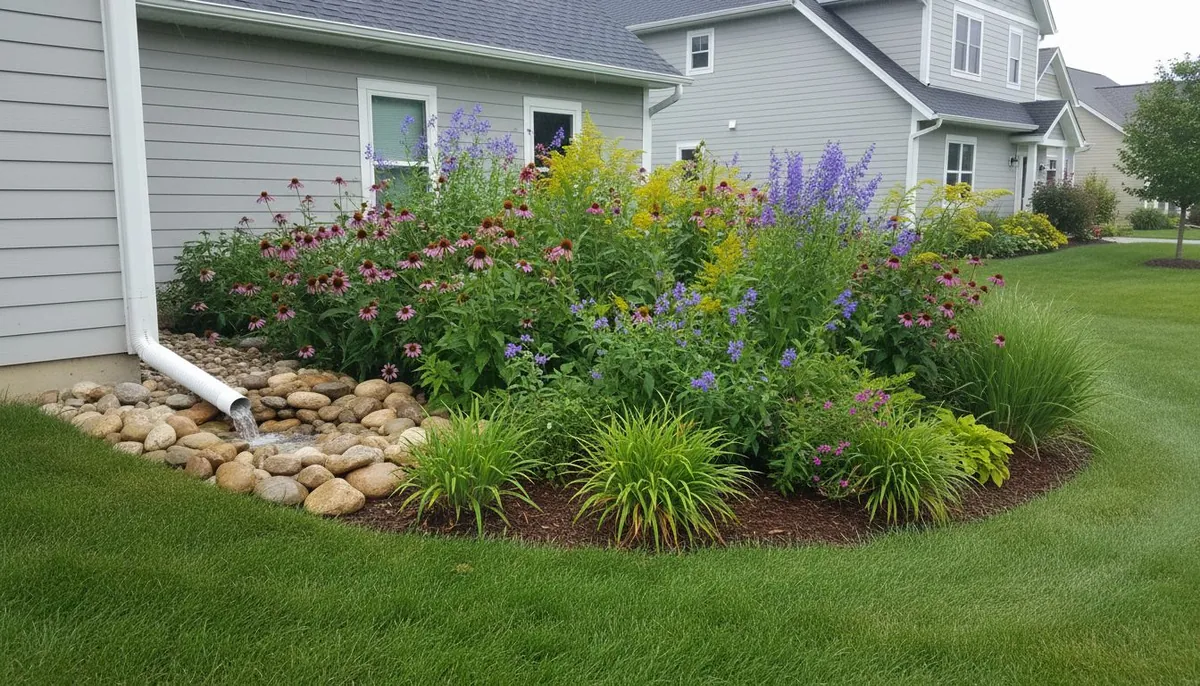
A rain garden is a shallow, planted depression that catches the stormwater runoff pouring off your roof, driveway, patio, and lawn, then holds it just long enough for the water to soak into the soil instead of rushing into the street. Rather than sending rain straight to a storm drain, a rain garden slows it down, spreads it out, and sinks it in, recharging the groundwater beneath your feet and filtering pollutants along the way. For anyone practicing permaculture, it is one of the most approachable earthworks you can build in a weekend, and it fits naturally alongside swales, rain barrels, and other water-catching strategies. This guide walks through what a rain garden does, how to size and site one, how to build it step by step, and which deep-rooted, water-tolerant native plants to fill it with.
What Is a Rain Garden and Why It Matters
At its simplest, a rain garden is a landscaped basin positioned to receive runoff. Water flows in through an inlet, ponds a few inches deep during and just after a storm, and then infiltrates over the following hours or days. A properly built rain garden is not a pond and is not meant to hold standing water for long. It is a temporary catchment designed to drain within roughly 24 to 48 hours, which is fast enough to prevent mosquitoes from breeding and to keep plant roots from drowning.
The reason rain gardens matter comes down to what happens when rain hits hard surfaces. Roofs, driveways, and compacted lawns shed water quickly. That fast-moving stormwater runoff picks up lawn fertilizer, pet waste, oil, sediment, and road salt, then carries the whole load into storm drains that often discharge, untreated, into the nearest creek or lake. The rush of water also scours streambanks and causes downstream flooding. A rain garden interrupts this chain in several ways at once:
- Reduces flooding and erosion by capturing the first surge of runoff and releasing it slowly into the soil.
- Filters pollutants as water percolates through soil and root zones, where microbes and plant roots break down or absorb contaminants.
- Recharges groundwater instead of piping rain away, helping keep local aquifers and streams flowing during dry spells.
- Creates habitat for pollinators, birds, and beneficial insects, especially when planted with native species.
In permaculture terms, a rain garden is a way to "slow, spread, and sink" water on your site, treating a heavy rain as a resource to be harvested rather than a nuisance to be drained. It pairs well with a whole-property approach to water management, where every drop is caught, used, or infiltrated as high on the landscape as possible.
How a Rain Garden Relates to Swales and Other Earthworks
If you have read about permaculture earthworks, you may already know swales, which are level trenches dug along the contour of a slope to catch and infiltrate water across a broad area. A rain garden is essentially a swale's compact, ornamental cousin. Where a swale spreads water along a long contour line to soak a hillside or feed a food forest, a rain garden concentrates runoff from a specific source, like a downspout, into a single planted basin. Both rely on the same principle: create a low spot, let water pool briefly, and give it time to sink. Many permaculture designs use them together, with swales handling broad landscape flows and rain gardens catching the concentrated runoff near the house.
A rain garden also complements water-harvesting tools you may already have. A rain barrel stores roof runoff for later irrigation, but barrels overflow quickly in a real storm. Directing that overflow into a rain garden gives the excess somewhere productive to go. Some gardeners chain the two: the barrel captures what it can for the dry season, and the rain garden infiltrates the rest.
How to Size and Site Your Rain Garden
Good rain garden design starts before you dig, with two questions: where should it go, and how big should it be?
Choosing the Right Location
Siting is the step people most often get wrong, so take it slowly. A few reliable rules:
- Keep it at least 10 feet from your house foundation so infiltrating water never threatens your basement or footings. Downhill from the house is ideal.
- Stay away from septic systems, well heads, and utility lines. Call your local utility-locating service before digging.
- Pick a naturally low or gently sloping spot where runoff already tends to flow, but avoid areas that stay soggy on their own, which signals poor drainage or a high water table.
- Aim for full or partial sun. Most of the toughest, deepest-rooted rain garden plants prefer sun, and sunnier basins dry down faster between storms.
- Avoid large tree root zones, where digging will damage the tree and roots will crowd your new plantings.
Before committing, run a simple percolation test. Dig a hole about 12 inches deep, fill it with water, let it drain fully, then fill it again and time how fast the water level drops. If the second fill drains within 24 hours, the site infiltrates well enough for a standard rain garden. If water lingers far longer, the soil is too heavy or the water table too high, and you will need to amend the soil heavily, choose a different spot, or design a system that drains to a different outlet.
Sizing the Basin
A rain garden works best when it is large enough to swallow the runoff it receives but not so large that it rarely fills. A practical starting point used by many extension services is to make the garden roughly 20 to 30 percent of the size of the hard surface draining into it. So a 400-square-foot section of roof might feed a rain garden of about 80 to 120 square feet. Sandy, fast-draining soils can use a garden on the smaller end of that range; heavy clay soils need the larger end, or extra depth of amended soil, because they infiltrate slowly.
Depth matters too. Most home rain gardens are dug 4 to 8 inches deep in the ponding area. Shallower basins suit flat yards and fast soils; deeper basins suit sloped yards and slower soils. Keep the bottom flat and level so water spreads evenly rather than pooling in one corner. On a slope, you will cut into the high side and build up a berm on the low side to create a level floor.
How to Build a Rain Garden Step by Step
Once you have chosen and sized your site, building the rain garden itself is straightforward manual work. Here is the sequence.
Step 1: Mark the Shape and Outline the Basin
Lay out the garden with a garden hose or spray paint. A long, kidney or crescent shape oriented across the slope works well, with the concave side facing uphill to catch incoming water. Make it wider than it is deep from front to back so water spreads out.
Step 2: Dig the Basin
Excavate the ponding area to your target depth, keeping the bottom flat and level. Pile the soil you remove on the downhill edge; you will use it to build the berm. Roughen the bottom and sides rather than compacting them, since smeared, compacted soil sheds water instead of absorbing it. If your percolation test was slow, dig several inches deeper and plan to backfill with an amended soil mix.
Step 3: Amend the Soil
Great rain garden soil drains freely while still holding enough moisture for plants. A common blend is roughly half sand, a quarter topsoil, and a quarter compost, mixed and returned to the basin to within your target ponding depth. Compost feeds the plants and the soil microbes that break down pollutants, while sand keeps the mix open and fast-draining. On already sandy sites you can skip most of the sand and simply enrich with compost.
Step 4: Build the Berm
Shape the excavated soil into a low, compacted ridge, or berm, along the downhill edge of the basin. The berm is what holds ponded water in place long enough to soak in rather than escaping downslope. Make it a few inches higher than the intended water level, and firm it well so it does not erode. Cover it with mulch or plant it to lock the soil in place.
Step 5: Create the Inlet and an Overflow
Water needs a defined path in and a safe path out. For the inlet, guide runoff from a downspout, a shallow swale, or a lawn channel into the basin, and armor that entry point with river rock or cobble so incoming water does not carve a gully. For the overflow, set the lowest notch in the berm, or a rock-lined spillway, so that when a truly heavy storm overfills the garden, the excess leaves gently at a spot you have chosen and stabilized, ideally toward a lawn or another infiltration area rather than back at the house.
Step 6: Plant and Mulch
Set your plants according to how much water each zone receives, then mulch the whole basin with 2 to 3 inches of shredded hardwood mulch, which resists floating away better than bark nuggets. Water everything in well, and keep the young plants irrigated through their first season until roots establish. After that, a well-designed rain garden is largely self-sustaining.
Choosing Rain Garden Plants
The best rain garden plants are deep-rooted natives that tolerate both a soaking and a dry spell, because a rain garden swings between the two. Deep roots are the secret to the whole system: they open channels in the soil that speed infiltration, they reach moisture during droughts, and they anchor the basin against erosion. Native species are strongly preferred because they are adapted to local rainfall patterns, need no fertilizer or supplemental water once established, and support native pollinators and wildlife.
Think of the garden as three moisture zones and match plants to each:
- The bottom (wettest zone) ponds water after every storm and stays moist longest. Use moisture-loving species here. Shrubby dogwood, such as red-osier types, and elderberry both handle periodic flooding and add structure and wildlife value.
- The slopes (middle zone) get wet but drain faster. This is prime territory for tough native grasses and wildflowers. Deep-rooted switchgrass is a workhorse here, its roots reaching several feet down to drive infiltration, and purple coneflower brings color and pollinator forage while tolerating the swings between wet and dry.
- The upper edge and berm (driest zone) rarely stays wet and behaves like ordinary garden soil. Drought-tolerant natives that would struggle in the soggy bottom thrive along the rim, blending the rain garden into the surrounding landscape.
Aim for a mix of grasses, sedges, and flowering perennials rather than a monoculture. A diverse planting, sometimes called a polyculture, spreads risk, extends the bloom season, and builds the layered root system that makes the basin infiltrate well and resist weeds. Group plants in drifts of the same species for a natural look and easier maintenance.
Maintenance and Fitting It Into a Bigger Water Plan
Rain gardens are low-maintenance, not no-maintenance. In the first year, water during dry spells and pull weeds so your chosen plants can fill in. After establishment, the annual routine is light: top up the mulch, cut back perennials in late winter, clear any sediment or debris that collects at the inlet, and make sure the overflow stays clear. Because the garden relies on infiltration, avoid compacting the soil by walking in it when wet, and never add fertilizer, which would defeat the pollution-filtering purpose and could leach nutrients into groundwater.
A rain garden delivers the most value as one piece of a whole-site water strategy. In wetter zones it captures and infiltrates the surplus; in drier zones you might lean on complementary methods. Efficient drip irrigation stretches whatever water you do apply, a greywater system recycles household water to trees and shrubs, and xeriscaping reduces the demand for irrigation altogether. Together with rain gardens, these approaches let a property absorb heavy storms and coast through dry stretches. Exploring the broader water topic will connect these techniques into a resilient design where runoff is never wasted and every rain event leaves your soil, not the storm drain, a little richer.
Sources
- United States Environmental Protection Agency (EPA), guidance on green infrastructure and rain gardens for stormwater management
- USDA Natural Resources Conservation Service (NRCS), soil infiltration and conservation practice standards
- University of Wisconsin-Extension, rain garden design and sizing manuals for homeowners
- Cornell University Cooperative Extension, native plant selection for rain gardens and stormwater practices
- United States Geological Survey (USGS), information on groundwater recharge and the urban water cycle
About the Author
Lucas is a writer and researcher focused on sustainable agriculture and permaculture practices.