
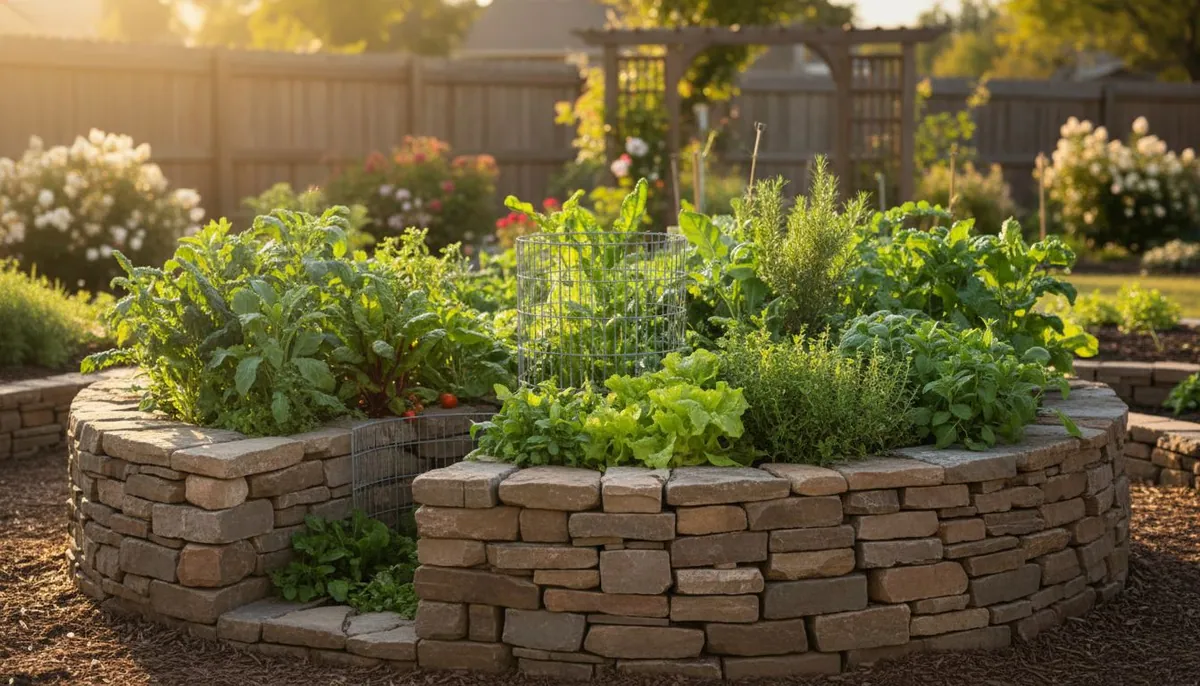
A keyhole garden is a circular raised bed, usually about six feet across, with a wedge-shaped notch cut into one side and a wire-mesh composting basket standing in the center. Seen from above, that access notch and the central basket make the bed look like an old-fashioned keyhole, which is where the name comes from. What makes it special is not the shape but the plumbing: kitchen scraps and greywater go into the middle basket, nutrients and moisture seep outward into the surrounding soil, and the bed effectively feeds and waters itself. For gardeners dealing with poor soil, hot weather, or unreliable rainfall, the keyhole garden is one of the most resilient designs you can build in a weekend.
This guide explains where the idea came from, why it holds water and fertility so well, how to build one from the ground up, and what to plant to get the most out of it.
What Is a Keyhole Garden?
At its simplest, a keyhole garden combines three ideas into a single structure: a raised bed, an in-bed compost pile, and a mounded soil surface that sheds water toward the roots rather than away from them. The retaining wall holds a deep body of soil off the ground, the central basket turns waste into slow-release fertilizer, and the whole bed is small enough that you can reach every plant from the notch without ever stepping on the soil.
The circular footprint is deliberate. A round bed encloses the most growing area for the least amount of wall material, and because the basket sits at the geometric center, no plant is more than about three feet from the source of nutrients and moisture. The notch, or "keyhole," is simply a path that lets you walk in and reach the basket. If you have built or read about raised bed gardening before, think of a keyhole garden as a raised bed with a built-in composter and a smarter shape.
The composting basket at the heart of it
The central basket is what sets this design apart from an ordinary raised bed. It is a cylinder of hardware cloth or chicken wire, roughly a foot in diameter, that runs from the base of the bed up above the soil line. You feed it the same way you would feed a compost pile: vegetable peelings, coffee grounds, torn cardboard, dry leaves, grass clippings, and household greywater. As that material breaks down, rain and watering carry dissolved nutrients out through the mesh and into the surrounding root zone. The basket is essentially a slow, continuous fertilizer dispenser sitting in the middle of your vegetables. If you are new to the process, our guide on how to compost at home covers the green-to-brown balance that keeps the basket working without turning sour or smelly.
Where the African Keyhole Garden Came From
The design most people picture today is the African keyhole garden, popularized through humanitarian and permaculture work in drought-prone regions of sub-Saharan Africa, particularly Lesotho and neighboring countries. Aid organizations promoted keyhole beds as a way for households facing poor soil, water scarcity, and food insecurity to grow vegetables close to home with materials they already had: stones, scrap wood, salvaged brick, ash, manure, and kitchen waste.
Two features made the design a good fit for those conditions. First, the raised, walled bed could be filled with layered organic matter and built up on top of hard, degraded ground, so gardeners did not need good native soil to start. Second, the central basket recycled household waste and greywater directly into the bed, which mattered enormously where every bucket of water counted. The same qualities that made keyhole gardens valuable in arid regions, namely drought tolerance, low input, and self-fertilizing structure, are exactly why they have spread to backyards, schools, and community plots around the world.
Why a Keyhole Garden Conserves Water and Feeds Itself
The keyhole garden works because several water- and nutrient-saving mechanisms stack together in one small footprint.
- Central moisture reservoir. Watering the basket, or adding greywater to it, wets the decomposing core, which then holds and releases that moisture slowly into the surrounding soil. Much less water is lost to runoff or evaporation than when you spray the whole surface.
- Deep, sponge-like soil. Because the bed is built from layers of organic matter, the soil behaves like a sponge, absorbing water during rain or irrigation and holding it for the roots between waterings.
- Mounded surface. The soil is shaped so it is highest at the center, near the basket, and slopes gently down toward the outer wall. Water applied at the middle moves down and outward through the root zone rather than sheeting off the edges.
- Continuous feeding. Every time you add scraps to the basket, you top up the fertility bank. There is no separate feeding schedule to remember; the bed is fed whenever you empty the kitchen bucket.
These principles are not unique to the keyhole shape. The same water-holding logic drives a hugelkultur mound, where buried wood acts as a moisture sponge, as covered in our piece on hugelkultur raised beds. Keyhole gardens simply concentrate that behavior into a compact, self-fertilizing circle. If water is your main constraint, it is worth pairing the bed with the broader strategies in our guide to water management for the whole garden.
How to Build a Keyhole Garden Step by Step
You can build a solid keyhole garden in a day or two with basic materials. Here is the full process.
1. Choose the site
Pick a spot that gets at least six hours of sun a day for most vegetables, sits on reasonably level ground, and is close enough to the kitchen that carrying scraps and water is easy. Convenience matters: a keyhole garden you walk past every day gets fed every day.
2. Mark out the circle and the notch
Drive a stake where the center will go, tie a string about three feet long to it, and swing it around to scribe a circle roughly six feet in diameter. That size lets you reach the middle from the edge. Then mark a wedge, like a narrow slice of pie, cut in from one side to the center. That wedge is your keyhole path.
3. Build the retaining wall
Lay up a wall around the circle, leaving the notch open, to a height of about waist level (roughly 24 to 40 inches). Height is a real advantage here, because it means little bending and easier harvesting. Use whatever you have: stacked stone, brick, concrete block, urbanite (broken concrete), logs, or rot-resistant timber. Dry-stacked stone is traditional and needs no mortar; just keep the wall leaning very slightly inward for stability as it rises.
4. Set the central composting basket
Roll a cylinder of hardware cloth or chicken wire about 12 inches across and tall enough to stand a few inches above the finished soil line. Stand it upright at the exact center and hold it in place with a couple of stakes. This is the composting basket that will feed the bed, so make sure the mesh is open enough for worms and moisture to pass through but tight enough to contain the material.
5. Fill the bed in layers
Fill the ring around the basket the way you would build a compost pile or a lasagna bed, alternating coarse and fine, carbon and nitrogen:
- Bottom layer: coarse, bulky material for drainage and structure, such as small branches, twigs, corn stalks, or cardboard.
- Middle layers: alternating browns (dry leaves, straw, shredded paper) and greens (grass clippings, kitchen scraps, manure), just as you would layer in sheet mulching or lasagna gardening.
- Top layer: six inches or more of good topsoil mixed with finished compost, which is where seeds and transplants go.
Shape the finished surface into a gentle dome, highest next to the basket and sloping down toward the wall, so water moves outward through the root zone. Water each layer as you build so the whole bed is moist from the start.
6. Plant, mulch, and start feeding
Once the bed is shaped, plant your crops and cover any bare soil with mulch to lock in moisture. From then on, add kitchen scraps and greywater to the central basket, and water the basket along with the bed. To keep the compost core active, occasionally add a scoop of finished compost or a few handfuls of chopped comfrey leaves, which break down fast and are rich in potassium.
What to Plant in a Keyhole Garden
A keyhole garden shines with leafy greens, herbs, and compact vegetables that appreciate steady moisture and a rich root zone. Because you harvest constantly and feed constantly, fast-growing crops suit it best.
- Leafy greens: lettuce, spinach, kale, chard, and other cut-and-come-again greens that reward frequent picking.
- Culinary herbs: basil, parsley, cilantro, and other kitchen herbs that thrive in the fertile, well-drained soil.
- Compact fruiting vegetables: bush beans, peppers, and smaller tomato varieties near the center where feeding is richest.
- Root crops: radishes, beets, and carrots do well in the loose, deep soil, though they prefer the outer ring where fertility is more moderate.
Plant more densely than you would in a conventional row garden. Close spacing shades the soil, keeps it cool and moist, and makes the most of a small footprint, the same polyculture thinking behind a herb spiral. Put taller or heavier feeders nearest the basket and lower-demand crops toward the wall.
Caring for Your Keyhole Garden
Keyhole gardens are low-maintenance, not no-maintenance. A little attention keeps the self-feeding cycle running.
Keep the basket working
Add a mix of greens and browns to the central basket, roughly the same balance you would use in an outdoor pile. If it smells sour, it is too wet or too nitrogen-heavy, so add dry leaves, straw, or shredded cardboard. If nothing is breaking down, it is too dry, so add water and more green material. Earthworms will find their way in and speed everything along; some gardeners even run the basket as a small worm bin, echoing the approach in our guide to worm composting.
Water smart
Direct most of your water into the basket and the center of the mound so it spreads outward through the soil. In very hot climates you can sink an unglazed clay pot into the bed for even slower, deeper delivery, the technique described in our article on olla irrigation. Keep the surface mulched at all times to slow evaporation.
Refresh the soil over time
As the organic layers decompose, the soil level will settle and drop, which is normal and a sign the bed is working. Once or twice a year, top it back up with fresh compost and topsoil, and re-mound the surface toward the basket. Rotate crop families between seasons to keep pests and diseases from building up, and replant the notch area, which often gets compacted from foot traffic, with a quick cover of greens.
Is a Keyhole Garden Right for You?
A keyhole garden earns its place if you garden in poor or shallow soil, face hot or dry conditions, want to recycle kitchen waste and greywater on site, or simply want a productive bed that needs less watering and no separate feeding routine. It is also a genuinely accessible design: the waist-high wall means far less bending, which makes it friendly for older gardeners or anyone with limited mobility.
It is less ideal if you have only deep shade, want to grow sprawling crops like winter squash or melons that will quickly outgrow the circle, or need a large-scale production plot, where long straight rows are more efficient. For most home growers, though, a single keyhole garden by the back door delivers a steady supply of greens and herbs with remarkably little input. Build one, keep the basket fed, and let the bed do the rest.
Sources
- Food and Agriculture Organization of the United Nations (FAO), guidance on household and container gardening for food security in arid regions
- Send a Cow, keyhole garden design and construction guidance for smallholder households in Africa
- Cornell Waste Management Institute, principles of home composting and carbon-to-nitrogen balance
- Oregon State University Extension Service, raised bed construction and soil management for home vegetable gardens
- Royal Horticultural Society, composting and no-dig raised bed practice
About the Author
Lucas is a writer and researcher focused on sustainable agriculture and permaculture practices.