
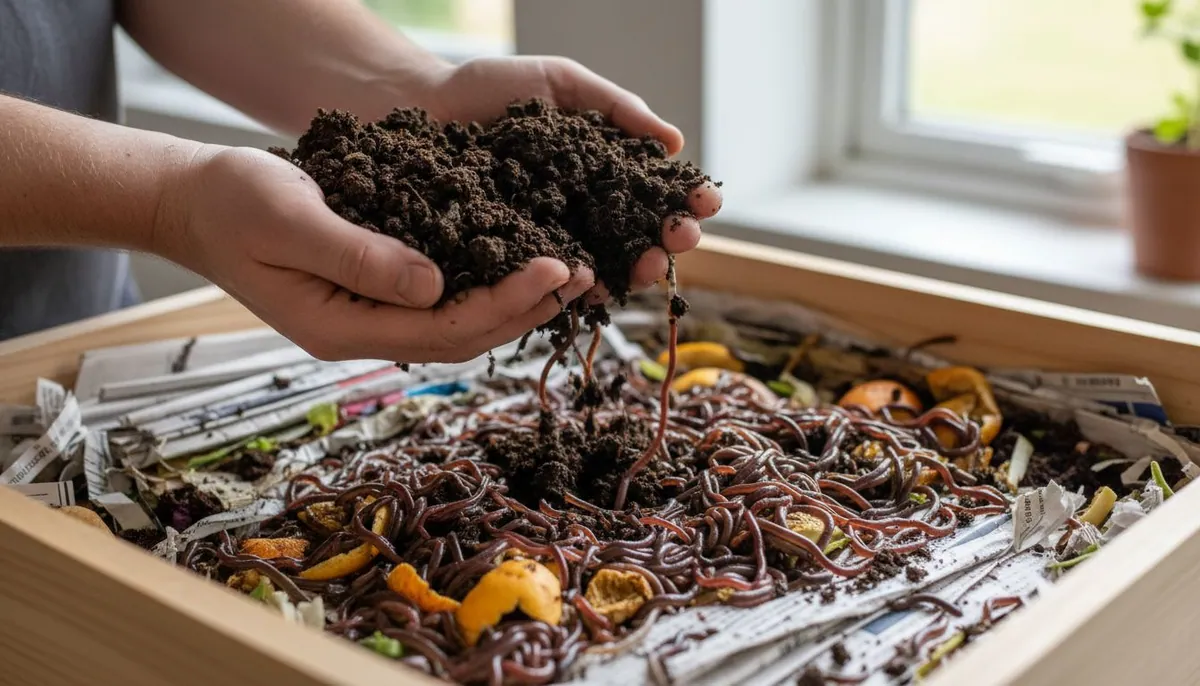
Worm composting is one of the fastest, cleanest, and most rewarding ways to recycle kitchen scraps into a premium soil amendment right on your kitchen counter, in a closet, or under the porch. Also called vermicomposting, the process harnesses specialized composting worms to break down food waste far quicker than a traditional pile, producing dark, crumbly worm castings that gardeners prize above almost any other homemade fertilizer. It is odorless when managed correctly, needs very little space, and works year-round indoors — which makes it ideal for apartment dwellers, urban gardeners, and anyone who wants to close the loop on household organic waste without a big backyard.
This guide walks through everything you need to start and run a healthy worm bin: what vermicomposting actually is, why castings are so valuable, choosing the right worms, building or buying a bin, preparing bedding, feeding correctly, managing moisture and temperature, and finally harvesting castings and brewing worm tea. If you are new to composting in general, it pairs well with our broader guide to composting at home, which covers hot piles, tumblers, and cold composting alongside the worm method described here.
What Is Worm Composting and Why Castings Matter
Vermicomposting is the process of feeding organic waste to composting worms, which consume the material and excrete nutrient-rich castings — essentially worm manure. Unlike a hot compost pile, which relies on heat-loving bacteria to break down material at high temperatures, worm composting is a cold, biological process driven by the worms themselves along with the microbes living in their gut and in the bedding. The worms shred and digest food scraps, and the microbial community does the finishing work.
The end product, worm castings (also called vermicast), is a fine, dark, earthy-smelling humus that improves soil in several ways at once. Castings hold moisture, improve soil structure, and deliver plant nutrients in slow-release, plant-available forms. Just as importantly, they are teeming with beneficial soil microbes that help plants access nutrients and resist disease. Because the nutrients are gentle and buffered, castings rarely burn plants the way concentrated synthetic fertilizers can — you can mix them directly into seed-starting mix, side-dress vegetables, or top-dress houseplants. They earn a permanent spot among the best organic fertilizers you can produce for free at home.
Choosing Your Worms: Red Wigglers
Not every earthworm is suited to a bin. The nightcrawlers you dig up in the garden are burrowing soil-dwellers that need to tunnel deep and will not thrive in a shallow container of food scraps. For vermicomposting you want epigeic species — surface-dwelling worms adapted to living in loose, decaying organic matter.
The workhorse of home worm composting is the red wiggler (Eisenia fetida), sometimes sold as red worm, tiger worm, or manure worm. Red wigglers tolerate crowding, a wide temperature range, and the constantly changing conditions of a bin. They eat voraciously and reproduce quickly, so a modest starter population can build to match your household's food output. A close relative, Eisenia hortensis (the European nightcrawler, also sold as Dendrobaena), is also used and is larger, though it works a bit more slowly.
A common starting quantity is one pound of red wigglers, roughly a thousand worms, which is enough for a small household bin. Buy from a reputable worm supplier or a fellow gardener rather than a bait shop, where species are often mislabeled. Under good conditions the population self-regulates to the available food and space, so you rarely need to buy worms twice.
Building or Buying a Worm Bin
A worm bin is simply a container that holds bedding and worms, retains moisture, admits air, and drains excess liquid. You can buy a purpose-built stacking tray system or make one cheaply from opaque plastic storage totes.
The DIY Tote Bin
To build a basic bin, take a shallow, opaque plastic tote of roughly 8 to 15 gallons — worms feed near the surface, so surface area matters more than depth. Drill a grid of small ventilation holes around the upper sides and in the lid, and several drainage holes in the bottom. Set the bin on blocks inside a second lidless tote or a tray to catch any liquid that drains out. Opaque containers are important because red wigglers avoid light and will stay burrowed in a dark bin.
Manufactured Stacking Systems
Commercial flow-through and stacked-tray systems make harvesting easier: worms migrate upward into fresh food in the upper tray, leaving finished castings below for easy removal. They cost more but save effort and look tidy enough for a laundry room or balcony. Whichever you choose, size the bin to your scraps — as a rough guide, worms can process up to about half their body weight in food per day once the colony is established.
Bedding: The Foundation of a Healthy Bin
Bedding is the carbon-rich material that fills most of the bin. It gives worms a place to live, holds moisture and air, and provides carbon to balance the nitrogen-rich food scraps. Good bedding options include shredded newspaper and plain cardboard, shredded brown paper, coconut coir, aged leaves, and small amounts of straw.
Moisten the bedding until it feels like a wrung-out sponge — damp but not dripping — and fluff it so it is loose rather than packed. Fill the bin about three-quarters full, add the worms on top, and let them burrow down before you begin feeding. A handful of garden soil or finished compost added to the bedding introduces grit that helps worms grind their food and seeds the bin with beneficial microbes. As the worms work, the bedding itself gradually becomes castings, so you will replenish it over time.
What to Feed Your Worms — and What to Avoid
Worms thrive on a varied diet of soft, nitrogen-rich kitchen scraps balanced against the carbon in their bedding. Chop or break up larger pieces to speed things along, and bury food under the bedding rather than leaving it exposed, which discourages fruit flies and odor.
Good Foods
- Vegetable and fruit scraps and peels
- Coffee grounds and paper filters, plus used tea leaves
- Crushed eggshells, which add grit and calcium
- Soft plant trimmings and small amounts of stale bread or grains
Foods to Avoid
- Meat, fish, bones, and dairy — they rot, smell, and attract pests
- Oily or heavily salted foods
- Large amounts of citrus, onion, and garlic, which are acidic and pungent
- Anything cooked with grease or heavy sauces
Feed in moderation and watch the response. If food is disappearing within a few days, you can add a little more; if it is piling up or turning slimy, you are overfeeding. Citrus peels and coffee grounds in excess can lower pH, so keep them a minor part of the mix. A dusting of powdered eggshell or agricultural lime helps buffer acidity if the bin starts to sour.
Moisture, Temperature, and Air
Three conditions keep a bin healthy: consistent moisture, moderate temperature, and airflow. Bedding should stay at that wrung-out-sponge dampness throughout. If it dries out, mist it; if it turns soggy, mix in fresh dry bedding to absorb the excess and restore air pockets.
Red wigglers are most productive at ordinary room temperatures, roughly between the mid-50s and the high-70s Fahrenheit. They survive cooler and warmer conditions but slow down markedly, and sustained heat above the low 80s or freezing cold can be fatal. Keep the bin out of direct sun and away from radiators. Indoors — a basement, closet, kitchen corner, or heated garage — usually holds a comfortable range year-round, which is a major advantage of vermicomposting over an outdoor pile in winter. Because worms breathe through their skin, never seal the bin airtight; the ventilation holes and loose bedding supply the oxygen they need.
Harvesting Worm Castings
After roughly three to six months, much of the bedding will have transformed into dark, uniform castings, and it is time to harvest. There are a few reliable methods.
- Migration: Push the finished material to one side of the bin and add fresh bedding and food to the other side. Over a couple of weeks the worms migrate toward the new food, and you can scoop out the nearly worm-free castings.
- Dump and sort: Empty the bin onto a tarp under bright light. Worms burrow away from the light, so you can scrape off castings in layers, pausing each time to let the worms retreat deeper, until mostly worms remain.
- Stacked trays: With a tiered system, simply lift off the bottom tray of finished castings once the worms have moved up.
Use fresh castings promptly for best microbial activity, or store them in a breathable container kept lightly moist. Blend them into potting and seed-starting mixes, work a handful into planting holes, or top-dress beds and containers. A little goes a long way — even a thin layer noticeably boosts most plants. Castings also pair naturally with other soil-building practices like mulching your vegetable garden to feed soil life from the top down.
Making and Using Worm Tea
Two liquids come out of a worm bin, and it helps to distinguish them. Leachate is the liquid that drains from the bottom of the bin. It can be useful but may contain compounds from partially broken-down food, so dilute it heavily and use it only on ornamentals rather than edibles.
True worm tea is made deliberately by steeping finished castings in water to brew a living microbial liquid. To make it, place a few handfuls of castings in a mesh bag or old cloth, suspend it in a bucket of dechlorinated water, and let it steep. Gardeners often add a spoonful of unsulfured molasses and an aquarium air pump to aerate the mixture for a day, which multiplies the beneficial microbes. Strain it and apply the tea promptly — within a few hours — as a soil drench around the root zone or, more cautiously, as a foliar spray. Worm tea is a gentle, biologically active tonic that complements, rather than replaces, the solid castings you work into the soil.
Troubleshooting Common Problems
Most worm-bin problems trace back to moisture, feeding, or temperature, and each has a straightforward fix.
- Bad smell: A healthy bin smells earthy. Foul odors mean overfeeding or too much moisture, creating anaerobic conditions. Stop feeding for a week or two, add dry bedding, and gently fluff the contents to restore air.
- Fruit flies or gnats: Usually caused by exposed food. Always bury scraps under bedding, add a dry layer on top, and cut back on feeding until the population settles.
- Worms escaping or crawling up the sides: Often a sign the bin is too wet, too acidic, or freshly disturbed. Check moisture, ease up on citrus and coffee, and confirm the temperature is in range.
- Worms dying or shrinking population: Look for temperature extremes, a bin that has dried out, or a shortage of food. Correct the underlying condition and the colony usually recovers.
- Other critters: Springtails, mites, and pot worms are common bin companions and generally harmless. Large populations can signal an overly wet or acidic bin — adjust conditions rather than reaching for pesticides, which would harm your worms.
Bringing It All Together
Worm composting rewards a light touch. Give red wigglers a dark, ventilated bin, damp carbon-rich bedding, a steady but modest supply of the right food scraps, and comfortable temperatures, and they will quietly turn your household waste into some of the finest soil amendment available. The payoff — rich castings and living worm tea — feeds your garden while shrinking your trash. Once your bin is humming, you can fold vermicomposting into a wider soil-building routine alongside biochar, cover cropping, and other organic methods for a garden that gets more productive every season. For the bigger picture on recycling organic matter at home, circle back to our complete composting guide.
Sources
- Cornell Waste Management Institute — Small-Scale Vermicomposting and Worm Composting resources
- USDA Natural Resources Conservation Service — Soil Health and organic matter management guidance
- North Carolina State University Extension — Worm Composting (Vermicomposting) publications
- Oregon State University Extension Service — Composting with Worms
- Royal Horticultural Society — Wormeries and composting guidance
About the Author
Lucas is a writer and researcher focused on sustainable agriculture and permaculture practices.