
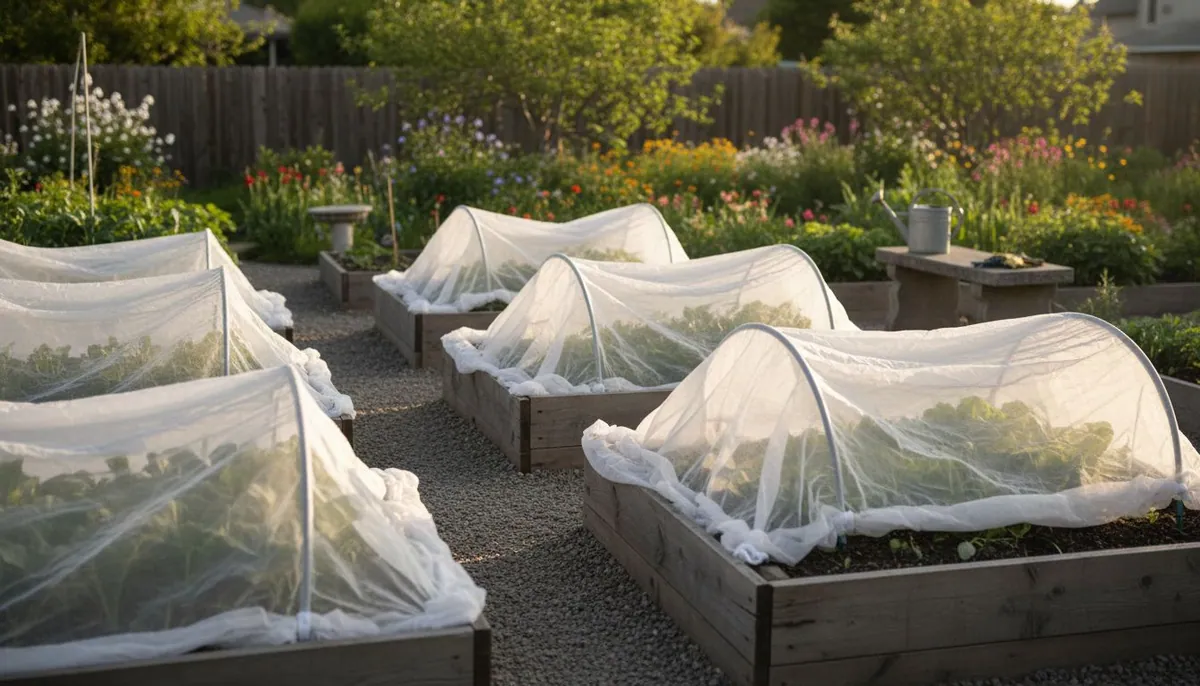
If there is one tool that has saved more of my vegetable crops than any spray in the shed, it is the humble row cover. A sheet of lightweight fabric draped over a bed is the closest thing I have found to a force field: it puts a physical wall between your plants and the insects that want to eat them, and unlike a pesticide, it works the same on the tenth day as it did on the first. In a permaculture garden, where the whole point is to solve problems with design rather than inputs, prevention-first barriers like this are the backbone of pest management. Sprays, even organic ones, are the fallback. Exclusion is the strategy.
In this guide I want to walk through exactly how floating row covers and insect netting work, the fabric weights and types you will actually choose between, how I install and anchor them so nothing crawls under, the one caveat that trips up more gardeners than anything else (pollination), and the bonus most people do not plan for: frost protection and season extension.
What a Floating Row Cover Actually Is
A floating row cover is a spun-bonded or woven fabric, usually polyester or polypropylene, that is light enough to lay directly on top of a crop and let the plants push it up as they grow. That is where the word "floating" comes from. According to Wisconsin Horticulture, the material stays permeable to light, water, and air, so rain and sunlight pass through while the fabric itself forms a barrier. You water right through it. You can leave it in place through a rainstorm.
People use "row cover," "garden fabric," "insect netting," and "exclusion netting" almost interchangeably, but there is a useful distinction. Spun-bonded fabric (the fuzzy, opaque white stuff) both excludes insects and traps a little heat, which makes it a dual-purpose tool. Woven insect netting and finer exclusion netting are mesh products, more like a fine screen, that exclude pests without holding much heat. In summer, when I only want the pest barrier and not the greenhouse effect, I reach for netting. In spring, when I want the warmth too, I reach for spun-bonded fabric.
The mechanism could not be simpler. Most of our worst garden pests are mobile adults searching for a host plant on which to feed or lay eggs. A flea beetle has to land on your arugula. A cabbage white butterfly has to reach your broccoli to lay eggs. The carrot rust fly has to find your carrot row to deposit hers at the soil line. If a fabric barrier is in the way, the whole life cycle stops before it starts.
Which Pests Row Covers Exclude
The list of pests a well-sealed cover keeps out is long, and it reads like the most-wanted board in any vegetable garden. Wisconsin Horticulture and the University of Maryland Extension together name the squash vine borer, squash bug, cucumber beetles, flea beetle, Colorado potato beetle, harlequin bug, Mexican bean beetle, and aphids, along with the whole cabbage-pest complex: imported cabbageworm, cabbage looper, and diamondback moth.
Covers also stop root maggot flies (the cabbage and onion maggots that ruin brassica and allium roots), thrips, and the leaf miner flies whose larvae tunnel between leaf layers on spinach and beets. That last one matters to me personally. The first summer I grew a proper bed of spinach, leaf miners turned half the crop into tan, papery scribbles before I understood what was happening. The next year I covered the bed at seeding and harvested clean leaves all spring. It converted me completely.
The two crops where I consider covers close to non-negotiable are the cucurbits and the brassicas. For squash, an early cover is often the difference between a harvest and a collapsed, borer-killed vine. For cabbage and its relatives, excluding the egg-laying moths and flies means I rarely have to think about caterpillars at all.
The Timing That Makes or Breaks It
There is a critical rule the extensions repeat, and I learned it the hard way: the cover has to go on before the pest arrives, and the pest must not already be in the soil underneath. Row covers block insects from feeding, but only if the insect did not overwinter in that exact spot. If you cover a bed where squash bugs or Colorado potato beetles emerged from the soil last season, you have just built them a predator-free tent. This is why Wisconsin Horticulture stresses crop rotation alongside covers: never put a susceptible crop, or a close relative, back on the same ground where its pest overwintered. Cover a rotated bed, not a repeat one.
Choosing the Right Fabric Weight
Row cover fabric is sold by weight, measured in ounces per square yard, and the weight determines the trade-off between how much light and warmth passes through and how much frost protection you get. University of Maryland Extension lays out three broad tiers, and these are the numbers I keep taped inside my shed door.
- Lightweight (about 0.45 oz/sq yd): 90 to 95 percent light transmittance and roughly 2°F of frost protection. This is the "insect barrier" weight. It passes almost all the light, so you can leave it on light-loving crops for a long stretch without stunting them. This is my summer pest-exclusion default.
- Medium weight (about 0.5 to 1.0 oz/sq yd): 70 to 85 percent light transmittance and 4 to 6°F of frost protection. A good all-rounder that speeds crop maturity and buys you a meaningful buffer on cold nights.
- Heavyweight (about 1.5 to 2.2 oz/sq yd): 30 to 50 percent light transmittance and up to 8°F of frost protection. This is a frost blanket first and a pest barrier second. The reduced light means you use it for short bursts, not all season.
The pattern to internalize is that light transmittance and frost protection pull in opposite directions. More insulation means less light. For pure insect exclusion in the warm months, I want maximum light, so I choose the lightest fabric or a woven insect netting. For pushing the shoulders of the season, I accept less light in exchange for more warmth. I keep a lightweight roll and a heavyweight roll, and between them I cover almost every situation.
How I Install and Secure Row Covers
A row cover only works if pests cannot walk in around the edges, and this is where most failures happen. A cover with a gap at the soil line is not a barrier; it is a shade cloth. For genuine pest exclusion, the edges have to be sealed to the ground on every side.
There are two ways to drape the fabric. You can lay it directly on the crop and let the plants lift it as they grow, which is fine for low, tough greens. Or you can build a low tunnel with hoops so the fabric never touches the leaves, which I prefer for anything the pests can reach by biting through fabric pressed against a leaf. I bend #9 wire or half-inch PVC into bows and space them a few feet apart down the bed, then lay the cover over the top.
To anchor the edges, Maryland Extension lists the usual suspects, and they all work: sod pins or landscape staples, boards, bricks, sandbags, rocks, or simply burying the fabric edge in a shallow trench of soil. For serious exclusion of soil-line pests like root maggot flies, burying the edges completely is the gold standard. Here is a detail I have learned to respect: leave slack. Pull the fabric taut and the growing crop will strain against it, tear it, or pop your anchors after a windy week. I keep a bin of bricks and sandbags by the beds so re-sealing after I peek inside takes seconds, and I still budget extra fabric at both ends to gather and pin down.
Covers pair naturally with transplants you started indoors. When I set out cabbage or squash seedlings, the cover goes on the same day, before a single moth or beetle has found the new bed. Covering at planting is far more effective than covering a bed that pests have already discovered.
The Pollination Caveat You Cannot Ignore
Here is the mistake I see most often, and it is a heartbreaker: leaving covers on insect-pollinated crops while they flower. A row cover does not discriminate. The same barrier that keeps a squash bug out also keeps every bumblebee and honeybee out. If your squash, cucumbers, melons, or zucchini are blooming under a sealed cover, no pollinator can reach the flowers, and you get lush vines with no fruit, or misshapen fruit that aborts.
The rule is straightforward. For any crop that needs insects to set fruit, remove the cover once flowering begins, both Maryland and Wisconsin Extension are explicit about this. In practice I run covers on my cucurbits from transplant until I see the first male flowers opening, usually around three weeks, then I pull them off and let the bees do their work. By then the plants are large and vigorous enough to tolerate some pest pressure, and I switch to scouting and spot-treating rather than exclusion.
The crops that get to keep their covers all the way to harvest are the ones we do not grow for insect-pollinated fruit: leafy greens, beets, carrots, radishes, salad mixes, and snap beans (which self-pollinate). Those can stay tucked in from seeding to harvest with no penalty. So my mental sort is simple: do I eat the leaf, root, or stem, or do I eat the fruit that a flower has to make? Leaf, root, and stem crops keep the cover. Fruiting crops lose it at bloom.
One more warm-season note. On tomatoes and peppers, covers come off well before midsummer regardless of pollination, because trapped heat above roughly 86°F causes blossom drop. Row covers are a cool-season and early-season tool for these crops, not a summer one.
The Bonus: Frost Protection and Season Extension
Even if pests were not a concern, I would own row covers for the temperature benefit alone. That same fabric that blocks a beetle also traps a layer of warmed air against the soil. Depending on the weight, that is anywhere from 2 to 8°F of frost protection, and a heavyweight cover can raise daytime air temperatures by 10°F or more. In spring, that lets me seed cool-season crops weeks earlier than bare ground would allow. In fall, it stretches the harvest of greens and roots past the first light frosts, sometimes from mid-September nearly to Thanksgiving in my beds.
This dual role is what makes row covers such an elegant fit for a low-input garden. One tool does two jobs, warming the soil and excluding pests, with no ongoing cost after purchase and years of reuse from a well-stored roll. I fold mine dry at the end of the season, keep them out of the sun, and a good fabric lasts me many seasons.
Where Covers Fit in a Whole Pest Strategy
I want to be clear that row covers are one layer in a system, not a silver bullet. They pair best with a foundation of organic pest control practices: crop rotation, healthy soil, and habitat for the beneficial insects that handle whatever slips past the fabric once it comes off. Because covers also keep foliage from being physically contacted and colonized by certain insect-vectored problems, they can play a modest role in preventing plant disease too. Wisconsin Extension notes, for instance, that excluding the aster leafhopper reduces aster yellows, a disease the insect spreads.
My own approach breaks into three moves. I exclude first with covers on the crops and at the times that matter most. I rotate beds so I never tent pests in with their favorite food. And when the covers come off for pollination, I lean on scouting and the beneficial insects a diverse garden supports. If you want to go deeper on any single pest a cover excludes, our pest control library has a dedicated profile for each one, from the squash vine borer to the carrot rust fly.
Start with two rolls, a light one for bugs and a heavy one for cold, a bag of landscape staples, and a handful of hoops. Cover your brassicas and cucurbits at planting, mark your calendar to pull the covers when the cucurbits bloom, and you will prevent more damage in a single season than a summer of spraying ever could. That is the permaculture way: design the problem out before it begins.
Sources
- University of Maryland Extension — Row Covers
- Wisconsin Horticulture (University of Wisconsin-Madison Extension) — Floating Row Cover
- University of Minnesota Extension — Root maggots (cabbage and onion maggots)
- University of Minnesota Extension — Leafminers in home gardens
- UMass Extension (Center for Agriculture, Food, and the Environment) — Insect Management in the Home Vegetable Garden
About the Author
Lucas is a writer and researcher focused on sustainable agriculture and permaculture practices.