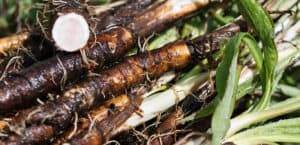
Is there a more universally appreciated vegetable? I can’t think of one! The carrots we eat today are domesticated versions of Queen Anne’s Lace, Daucus carota. Thousands of years of evolution alongside humans have led this plant, once cultivated for its leaves and seeds, to be enjoyed for the sweet crunch of its colorful roots.
I’d put growing carrots at the level of Gardening 202. It requires a little bit more planning and attention than a crop like green beans. But don’t let that intimidate you! The act of pulling a carrot fresh out of the soil is definitely worth the extra effort.
Varieties
With proper variety choices and staggered plantings, you can grow and eat carrots all year round!
Early carrots (seeded late-Fall – early Spring) are typically more slender and sweet. They should be harvested before the weather gets too hot, or they’ll begin to get woody.
Popular varieties: Mokum, Yaya, Nelson
Main Crop carrots (seeded late Spring – early Summer) put on quick growth, usually taste really “carroty” and less sweet, and have a relatively short harvest window.
Popular varieties: Sugarsnax, Naval
Storage carrots (seeded mid-late Summer) are the heftiest in the group. They size up well, get sweet with cold weather, and keep well if stored properly.
Popular Varieties: Hercules, Bolero
Oddballs: Choices are not limited to orange and tapered! Carrots come in a rainbow of colors (white, purple, yellow, red). Round, globe-shaped carrots are also quite popular – and a great solution for clayey or compacted soil.
Popular varieties: Dragon, Purple Haze, Thumbelina
Bed Prep
Like many plants, carrots don’t do well with big swings in moisture or temperature. In an ideal world, carrots like deep, friable soil with good water retention, a slightly acidic pH (somewhere in the 6’s), and no competition from weeds – and definitely not a lot of rocks to figure out how to grow around. So yeah, they’re a little finicky. But there are some steps you can take to amend and prepare your planting area to set you and your carrots up for success.
- Choose a spot with full sun. Carrots grown in the shade will have sprawling greens, searching for light, and not much in the way of roots.
- Clear the area of weeds. Carrots begin their lives as tiny grass-thin seedlings, and are not able to compete with other plants. Before planting, give your plot a thorough weeding. In some instances, growers will flame-weed an area before, and shortly after, seeding carrots to give them an upper-hand on getting established.
- Add well-aged compost. While carrots do not have high needs for Nitrogen (as roots, they tend to be more dependent on Phosphorus), they do appreciate a boost. We add a couple of inches of balanced compost across our growing areas.
- Broad fork if needed. If all you have to work with is clay soil, consider loosening it with either a regular garden fork or a tool specifically designed for the task: a broadfork. This step will aerate and soften the soil without disturbing its structure too much, and it’s also a great way to incorporate your compost.
Seeding
It’s best to direct sow carrots, as they do not transplant well. Carrots are notoriously tiny – similar to a fennel seed, but smaller – and a little difficult to handle individually. Many seed companies make pelleted seed available for this reason. It has an extra coating that makes it easier to handle by hand or to sow with a seeding device. Seed should be sown at a depth of ¼-½” in rows 1’ apart. Because carrots are slow germinators (1-3 weeks), we try to time our seeding directly before a soaking rain (Careful! A real downpour can definitely wash away this shallow seeding).
To thin or not to thin?
That really is the question, and its answer will help you figure out how you ought to seed your carrots. Seeding and thinning carrots can both be laborious, tedious tasks. Choosing to spend more time on one cuts back on the effort required for the other.
Here are some options:
- Seed carrots by hand. Sow regular or pelleted seeds in rows – or 2” wide bands – about a foot apart, and spacing of ½” to 2” within those rows. For a small planting, this is a great choice. If you’re exacting with your seeding, no need to thin later! If you go with more of a seed-sprinkling method (I can relate), you’ll likely have to go back and thin your seedlings once they emerge.
- Seed carrots with sand. Mixing your carrot seeds with sand is a good way to spread them out and achieve better spacing when you plant. Combine your seeds with sand in a yogurt container, and then pour the mixture down a shallow (¼”-½”) furrow. Cover seeds lightly.
- Seed carrots with a walk-behind seeder. If you’re sowing more than 50’ of carrots, this is the method I’d suggest. We have an Earthway seeder with a specific seeding plate for small-seeded crops like lettuce and carrots. We set it to just over ¼” depth, and make a few passes down each row to create a small, 2” wide band. This goes VERY quickly which means, you guessed it, we have to spend more time and energy thinning the carrots once they emerge.
Pro Tip: Because carrots take so long to germinate, it can sometimes be tricky to keep track of where you’ve put them. Add a few radish seeds to your planting. They’ll sprout quickly, marking your rows. And, in some cases, they can break the crust on the soil, allowing the carrots to push through more easily.
Watering
Carrots have different irrigation needs at different times in their growth:
- Germination and Emergence: Water carrots early and often at this stage, keeping the soil surface damp. They are shallowly seeded and delicate, and can easily dry out or burn.
- Early Growth: There’s a delicate balance to be found at this Goldilocks stage: not too wet, not too dry. If carrots are waterlogged at this time, they’re less likely to elongate by pushing deeper in the soil in search of moisture. But if they’re too dry, they’ll be forked, stressed, and their flavor will be impacted, too. An inch of water a couple of times a week is a good rule of thumb at this stage.
- Sizing Up: The carrot has reached a good depth and is now putting on heft. A deep watering once a week is perfect in this sizing up stage.
Weeding/Thinning
Weeding and thinning become one and the same thing with carrots. If they’re in competition with neighboring plants (or each other), they won’t size up. It’s best to thin and weed once the carrots have at least one set of true leaves, so they can withstand a little bit of disruption – but really only a little.
Using scissors to thin carrots is a good, and admittedly tedious, way to thin them without disturbing their roots. The spacing you’re looking for depends on the variety of carrot you’re growing. Spring and Summer carrots tend to be thinner, so a spacing of ½”-1” is appropriate.
We like our Fall carrots to really size up so they’ll hold well in storage; those, we thin to a spacing of 2”. Your carrots can only grow into the space you make for them; don’t avoid or skip this step, or you’ll end up with super-thin roots.
Disease Pressure – Pretty Minimal!
There are various blights and leaf spots that can affect carrots. These can be largely avoided using preventative measures like rotating your plantings, ensuring adequate airflow, and using drip irrigation instead of overhead watering.
Carrot Pests
We don’t think of carrots as being a particularly vulnerable crop on our farm, but there are a few things to look out for:
Carrot Rust Fly – The larvae of this fly make their homes in carrot roots. Once your carrots have germinated, cover them with row cover to prevent these flies from laying their eggs.
Wireworm – These coppery inch-long segmented creatures look similar to mealworms, and will also burrow into the carrot roots. They thrive in ground that was recently turned from sod. Tillage can help cut down their numbers. There are also beneficial nematodes that can be applied to the soil, and specifically target wireworms.
Deer, woodchucks, rabbits, mice, etc – These creatures love carrots as much as we do, and are quite happy to eat the tops as well as the roots. Measures we’ve used to keep them away include live traps, electric fencing, and noisy dogs.
Harvest!
Use the days to maturity on your seed packet as a guide to when your carrots will size up, but also feel free to gently dig next to them and see how they’re doing. Spring and Summer carrots have shorter harvest windows; Fall/storage carrots can actually stay in the ground all Winter long if given a thick blanket of straw – and they get sweeter with the frosts!
We use a garden fork to loosen the soil around our carrots, and pull them up by the greens.
When harvesting carrots for market, we bunch them in the field, clean the roots using a hose with a spray nozzle, and refrigerate them in a covered rubber bin to be sold within the next few days. If carrots are meant to be refrigerated/stored for longer, it’s important to remove their greens by twisting or cutting them off. We harvest our storage carrots in mid-late October, twist their greens off, spray the roots clean, and store them in our root cellar. They keep quite well in those cool, damp conditions, whereas the airflow of a refrigerator can really dry them out.
Carrot Greens, the Unsung Heroes
My sense is that no one really needs to be told how to eat a carrot. They’re so tasty, fresh as snacks, in salads, roasted, etc. However, did you know that their greens are also edible and delicious? Particularly when they’re younger and tender, carrot greens (which taste similar to parsley) can be used to make pesto, tabbouleh, and chimichurri. They are also a great addition to homemade vegetable stock. Now you know!
Parting Thoughts
Grocery store carrots are no match for those pulled fresh from your own garden. We’ve seen the ways our farm carrots make people’s eyes and taste buds light up. With a little preparation and care, you can add these versatile roots to your garden plan – for Spring, Summer, or Fall!