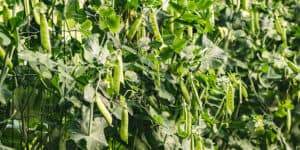
Crisp, sweet, and especially delicious when homegrown, peas are an excellent addition to the garden. Not only do the plants provide food, they also fix nitrogen in the soil and can be used strategically in companion plantings. A cool-season annual, peas are relatively easy to grow once you figure out the appropriate planting time for your region.
The Pea Trifecta: Sugar Snap, Snow, and Shelling
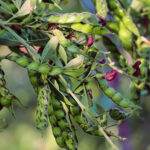
There are many different kinds of peas, some used for animal fodder, cover cropping, or cut flowers (sweet peas), but we’re just going to dive into the three types most widely enjoyed for fresh eating: sugar snap, snow, and shelling peas.
Sugar snap peas are sweet, crunchy, and juicy – edible, pod and all.
Popular snap pea varieties: Sugar Snap, Super Sugar Snap, Sugar Ann, Mega
Snow peas are thinner, have a bright, herbaceous flavor, and are also delicious, pod and all.
Popular snow pea varieties: Oregon Giant, Avalanche
Shelling peas must be removed from their pods to be eaten. They are sweet, vibrant green, and most often eaten cooked.
Popular shelling pea varieties: Premium, Bistro, Perfection
Bush vs Pole Peas
The pole varieties of peas are the most widely grown, reach heights of upwards of 5-6’, and require extensive trellising. Bush varieties, on the other hand, grow to 2-3’ tall. They may also benefit from some kind of staking or support.
Bush types tend to produce fruit earlier than their pole counterparts, and in a more concentrated set. The pole peas, for whatever reason, are usually sweeter – and easier to harvest.
There are certainly pros and cons for each, depending on the needs of your body and your garden space.
Site Prep
Even though they are cool-weather crops, peas should be grown in full sun. This is because the focus is the growth and sweetening of their fruits, the pea pods. An area that gets a little morning shade can help to moderate temperatures. Fairly shallow-rooted, peas require well-drained soil to thrive.
Peas have very low need for Nitrogen (they fix their own), but do make good use of Potassium and Phosphorus. A well-balanced compost is usually adequate; wood ash and bone meal can be helpful additions the previous Fall if your soil is lacking. As with so many crops, a pH in the mid-high 6’s is ideal.
Lastly, your planting spot may be affected by the peas’ need for a trellis. Consider where you have room to erect one – AND think, too, on how the presence of that trellis will affect the plants growing nearby (a tall trellis planted on the south side of a garden will shade the area to its north, for example – this can be an asset or a detriment!).
Trellising
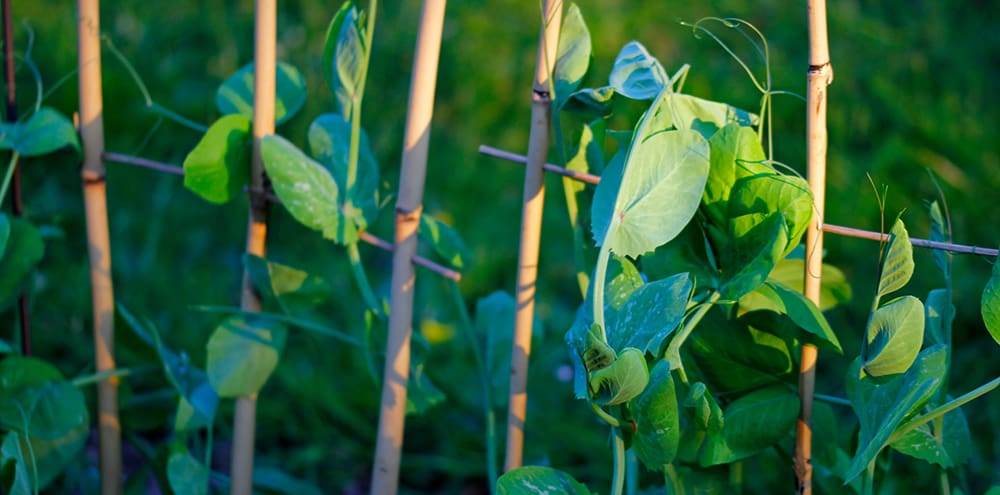
First things first, trellis your growing area for peas before you seed. You won’t regret it. It’s less disruptive to the plants to do it this way, and it ensures that it actually gets done. Peas are excellent climbers if given something to grab onto with their tendrils; conversely, they can be a mess of jungly vines if not given that support. Even bush peas benefit from trellising, if they reach a height of 2’ (which most of them do).
We use a gridded plastic netting called Hortonova to trellis our pole peas. We pound 6-8’ tall T posts in a single line down the middle of a bed at a spacing of 5-6 feet. Then we attach the netting to the posts using industrial style zip ties. While it takes some work to clean the trellis up once the peas have been pulled, we have been able to reuse this system many seasons in a row. Chicken wire and hog panels are sturdier (and more expensive) tools available. A teepee made of wood or bamboo is great for smaller plantings. For bush peas, it’s possible to get away with driving wooden or metal stakes every four or five feet along the outside of the bed, and stringing taut twine between for the plants to lean on.
The peas may need assistance, especially early on, grabbing onto your trellising system. You can gently direct them towards it, even helping them wrap their tendrils around the support. Often, once our pole peas are fully grown, they require an extra length of twine mid-height to hold them tight to the trellis.
Planting – The Timing Matters!
Early Spring turns into a bit of a waiting game on our farm, as we (somewhat obsessively) check our soil temperatures and gauge the short and long-term forecasts. The prospect of enjoying peas sooner than later (or being the first vendor at market to have them) is an exciting one. But we’ve all been burned – or, more accurately, frozen – by seeding our peas too early.
Most soil packets for peas will advise planting “as soon as the soil can be worked.” This refers to a time when the ground is no longer frozen, and has warmed and softened enough so that it doesn’t clod together when forked or raked. Soil texture is indeed one indicator for planting time. Equally important is soil temperature. Peas germinate best at a temperature of at least 50℉, will put on faster growth in the 50-70℉ range, and will rot in the soil if it’s in the 40’s for too long. Routinely we’ll plant one bed at the earliest possible moment (late March most years), only to see it surpassed by a bed of peas we planted one or two weeks later.
Part of the urgency in seeding peas early is that they are indeed a cool-season crop. The plants are healthiest and the yields are highest when they are able to grow in mild temperatures. This rarely happens for us in Michigan, where the month of June (the month our Spring planting of peas typically comes to fruit) often sky-rockets to temperatures upwards of 80℉. There are other ways to moderate the effects of dry heat on pea plants, but an early planting is a great place to start.
Some growers have great success with a fall planting of peas. This, too, requires an eye on timing. A July seeding gives the plants time to put on fruit before heavy frosts begin. These later plantings are more successful if you can find ways to cool the soil beforehand (deep watering, heavy mulch, etc).
If you fall a bit behind with your seeding, try pre-soaking the peas to speed their germination. Submerge them in warm water overnight, 8-12 hours, the day before planting. This will plump them up, and bring them closer to sprouting. Alternatively, you could fully sprout them the way you would culinary sprouts. But you’d have to be especially careful during planting not to break the sprouted tails.
Inoculation
It is often recommended to inoculate peas and other legume seeds. The process of inoculating seeds is to coat them in a slurry of beneficial bacteria, usually available as a powder diluted in some kind of a substrate (peat, for example). These beneficial bacteria encourage the growth of root nodules, which are responsible for legumes’ fixation of nitrogen in the soil. They also improve the overall health and vigor of the plant, making it less susceptible to disease and pest pressure. Legume inoculants are available for purchase from many seed companies. Keep in mind that a little goes a long way – and that they are living organisms that carry an expiration date for effectiveness.
Peas Make Good Companions
Peas should definitely be considered for companion planting in your garden. Combinations that have worked particularly well for us include pole peas with lettuce, radishes, or spinach.
Propagation
Direct Seeding (Recommended)
After rolling your peas, pre-soaked or not, around in the inoculant powder, you can either plant them by hand or use an Earthway-type garden seeder with a large seeding plate. Seed 1” deep at a spacing of 2” in rows 12-18” apart. After years of planting 3 rows of bush peas/bed, we finally switched to 2 rows/bed. And the effect was immediate! Not only did our yields increase, but harvest was dramatically easier. The extra spacing also diminished the molding and rotting of the plants and fruits. When seeding along a trellis for pole peas, err on the conservative side for your row spacing (16” between rows with the trellis in the middle). While the plants are capable of stretching and reaching towards their support, they expend extra energy in the process.
Irrigation
Peas abide by the adage of one inch of water per week. Drip irrigation is ideal, as it cuts down the likelihood of having to deal with mildew issues. Do your best to remove weeds in your growing area that could compete with the shallow-rooted plants for water and other nutrients.
Mulching
Growing a cool-weather plant in the Spring in Michigan is a bit of a paradox. We help regulate the moisture and temperature of the soil by mulching our peas with a 2-4” layer of leaves or straw.
Disease Pressure
Peas can be susceptible to root rot. Your best deterrent is well-drained soil and at least a 3-year crop rotation. Powdery mildew is a more common problem that we encounter. It can be avoided – or at least held off – by avoiding overhead watering and planting mildew-resistant varieties.
Pests!
Insect pressure on our peas seems to be highest as they are just getting established. Cutworms, in particular, take advantage of this vulnerable time. Beneficial nematodes are a good preventative; delaying your planting date can also ensure that your plants begin with vigor.
In the latter part of the peas’ growth, the biggest pest pressure is all mammalian: deer, woodchucks, and bunnies. Fencing, live traps, and raucous dogs have been our most effective go-to’s.
Harvesting
Peas are such an ephemeral early-Summer treat! Often, the full length of their growing season is three weeks to a month max. During that time, the window between sweet crunchy peas and stiff starchy pods can be a short one. Harvest peas every 2-4 days at the height of the season to keep up with their growth. Pick them by pulling downward at a little crook in the stem, about a ½” above the pod. This preserves what we call the little “hat” on top of the pea, the stem and bit of leaf at the top of the pod. It is absolutely fine if this hat breaks off; the peas just won’t keep quite as long.
Indicators for being harvest-ready vary by the type of pea:
Sugar snap peas are harvestable at just about any size, but will be dramatically sweeter – and heavier – if you wait until they have rounded out to a pencil-sized girth. You’ll find sugar snaps of all different lengths; harvest readiness and sizing up have more to do with filling out and becoming more 3-dimensional. When in doubt, do a taste test!
Snow peas are eaten more for their pods. While they will get sweeter when the tiny peas inside grow, their flavor is more fresh, green, and herbaceous. Harvest snow peas when they’ve reached 3-4 inches in length and have puffed out in thickness a bit.
English shelling peas are eaten entirely for the peas within. Allow them to grow to the point where the peas have fully filled out their pods. There should be bright green spheres within, all about the size of the seeds you put in the ground.
While the types of peas have their own unique attributes, this commonality is true: If the quality of the pods has turned from glossy and green to a matte yellow-gray, the pea is likely to taste starchy and chewy. At this point, the peas are best left for seed.
Seed Saving
Peas have what is called a “perfect flower,” meaning they self-pollinate without the help of insects, wind, etc. This makes them a great candidate for seed saving. They are VERY unlikely to have crossed with each other or anything else in the garden. Allow pods to dry fully on the plants, until they reach a matte tan color, then pull them clean off. If there’s still any moisture left, finish drying them indoors on a screen until the pods are papery and the peas within are dull and wrinkled. Keep the seeds in a cool dark place until the following season.
Preserving the Flavor
Sugar snap, snow, and shelling peas are all very bright and delicious fresh. They can also be preserved for later use by blanching and freezing them. In our experience, the shelling peas (removed from their pods first) are the best candidate for this preservation. These frozen peas can be used in soups, stir-fries, and curries.
Parting Thoughts
Peas are a delicious – and fairly easy – addition to the home garden, perfect for fresh eating. With a bit of planning, they can be enjoyed twice over in a growing season.