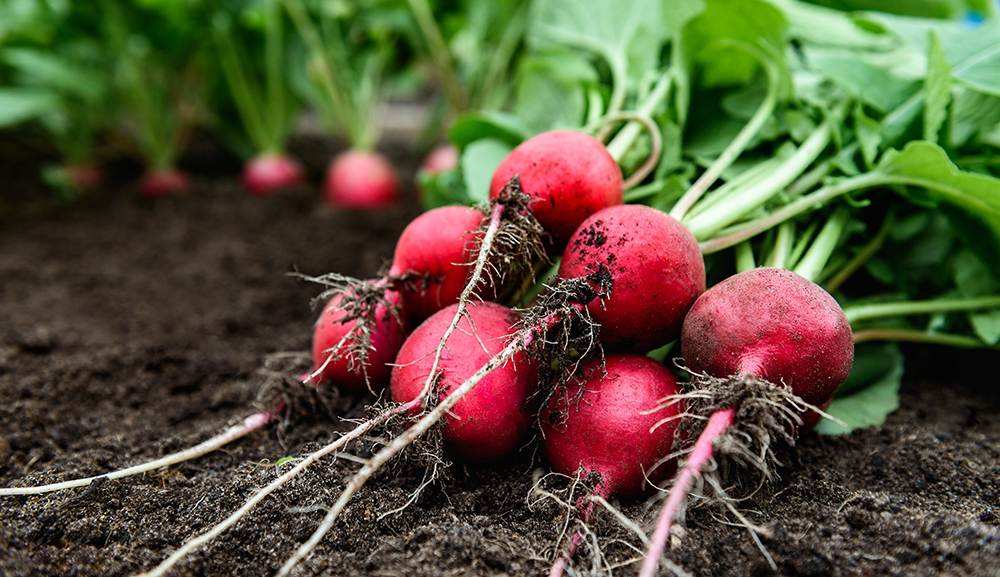
Nobody respects the radish. I've watched beginning gardeners toss a handful of seeds into the ground almost as an afterthought, something to fill space while they wait for the tomatoes to matter, and then act genuinely surprised when they pull a glossy scarlet globe out of the soil three weeks later. That speed is the thing people dismiss as simplicity, when really it's the plant's most radical trait. A crop that goes from seed to table in 22 days isn't basic; it's doing something biochemically furious underground, packing glucosinolates and water and crunch into a root before most vegetables have even sorted out their second true leaf.
What shifted my thinking about radish wasn't growing it, it was tasting one pulled straight from the bed on a cold April morning, snapped in half and eaten standing up in muddy boots. The heat hit first, that sinus-opening, sulfurous sharpness that tells you something is biologically active in your mouth. That pungency isn't just flavor. It's the same chemical machinery that's been making radish useful to humans for thousands of years, from ancient Greek temples to modern cover-cropping systems, and understanding it changes how you grow the plant, when you harvest it, and honestly how seriously you take it.
Origin and History of Radish (Raphanus sativus)
Most vegetables have a tidy origin story. Radish doesn't. Raphanus sativus appears to have been domesticated independently across multiple regions, with genetic and archaeological evidence pointing to separate events in Southeast Asia, East Asia, South Asia, and the Mediterranean.[1][2][3] That's a remarkable thing for a single species, and it tells you something essential about this plant: it's extraordinarily adaptable, and people kept discovering its usefulness on their own.
Botanical Background and Visual Characteristics
Radish belongs to the Brassicaceae family, which puts it in excellent company alongside kale, mustard, and horseradish. It's classified as an annual or biennial herbaceous plant, though in the garden we treat it almost exclusively as an annual.[4] Cultivated salad types can complete their entire cycle in 20 to 30 days; longer-storing winter types take 60 to 75 days.[5] The wild form is biennial and requires cold vernalization to bolt and flower, which explains why a warm spring can push garden radishes to flower before you've even had a chance to harvest the root. I've watched this happen more times than I'd like to admit.
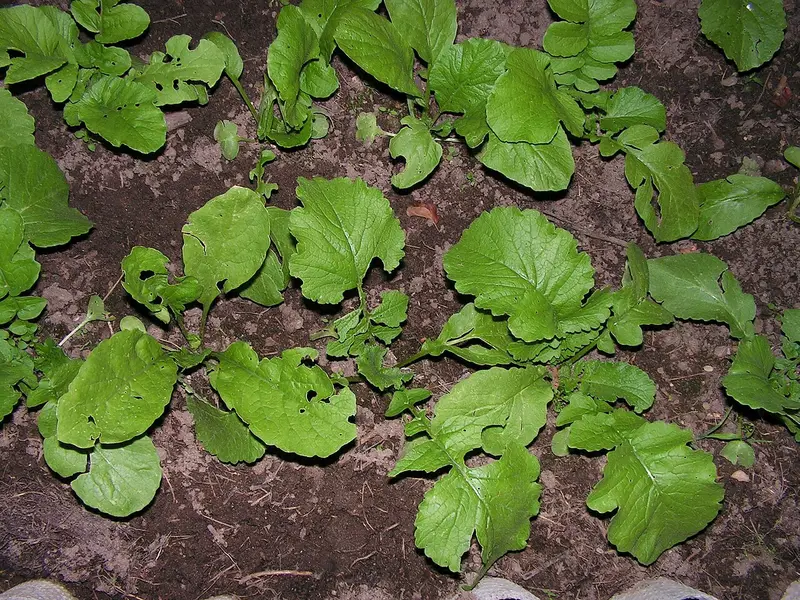
The plant itself grows 20 to 60 centimeters tall, with a basal rosette of grayish-green, deeply lobed leaves that have a soft, pubescent texture on their undersides. The flowers are classic Brassicaceae: small, cruciform, pale white or lavender, arranged in open terminal racemes.[4][6] The edible part is the swollen taproot, which can be round or elongated, and comes in skin colors ranging from scarlet to white, deep purple, or near-black depending on the cultivar. Then there's the rat-tail radish (Raphanus caudatus), which flips the whole script: it grows 1 to 2 meters tall and produces long, snake-like edible seed pods instead of a swollen root.[7][8] Worth knowing about if you're hunting for novelty and heat-season production.
The wild relative, Raphanus raphanistrum, is a persistent annual weed capable of producing up to 5,000 seeds per plant and hybridizing with cultivated types.[9] It's one reason saving seed in mixed gardens requires some care.
Traditional and Cultural Uses
Cultivation traces back to roughly 2,500 to 2,000 BCE, with strong evidence from ancient China, where radish appears in Zhou Dynasty texts and the Shijing (around 1000 BCE), and from India around the same period. By the 3rd century BCE, it had reached the Mediterranean, where Hippocrates, Pliny the Elder, and Columella all documented multiple cultivated varieties.[3][10] European colonists carried it to the Americas in the 16th century, making radish one of the earliest Old World vegetables to cross the Atlantic.
In Traditional Chinese Medicine, the root aids digestion and resolves phlegm, while the seeds (known as Lai Fu Zi) address food stagnation. Ayurvedic practice uses radish for detoxification and digestive balance, and in European herbalism, from medieval manuscripts through Culpeper's era, it treated jaundice, liver complaints, and scurvy.[11][12] These uses persisted across such different cultures largely because radish is so fast and foolproof to grow that it was always available when needed. Symbolically, radishes have carried meanings of prosperity, fertility, and protection across Chinese New Year traditions, Japanese purification rites, and ancient Greek rituals.[10]
Fun Facts About Radish
Daikon and winter storage types demand significantly deeper, looser soil to accommodate their mature size compared to shallow-rooted spring cultivars.[13] I've grown both, and the daikon always humbles me into actually double-digging a bed. Pungency is driven by glucosinolates, and cooler growing temperatures concentrate them, which is why a radish pulled in a crisp April morning has that sharp, almost mustard-like bite that pairs beautifully with a creamy dip, while the same variety sown into warm summer soil tastes comparatively flat.[14]
Oilseed and forage radish varieties do serious ecological work as cover crops. Their deep taproots scavenge nitrogen to prevent leaching and hold nutrients in the upper soil profile until they decompose for the next crop.[15][16] I've turned them into beds ahead of spring planting and noticed measurably better tilth the following season. Because radish can bioaccumulate heavy metals in contaminated soils, verifying your site's history is essential before eating abundantly from beds used for phytoremediation.[17]
Culturally, radish keeps surprising. Oaxaca's annual Noche de Rábanos festival involves competitive carving of large roots into elaborate scenes. In Japan, daikon becomes the fermented pickle takuan; in Korea it anchors kimchi; in India it fills mooli paratha.[10] Few vegetables travel so comfortably between medicinal tradition, festival pageantry, and daily cooking.
Radish Varieties and Cultivars
For a plant that looks so simple sitting in the grocery store produce aisle, radish hides a genuinely astonishing range of diversity. All of it traces back to one species, Raphanus sativus, shaped by thousands of years of selection across Asian and Mediterranean growing cultures.[18] What we call "radish varieties" today aren't really classified by strict botanical rules; they're grouped by root shape, size, seasonality, and how people actually use them.[19][20] The range is wider than most gardeners expect until they start exploring beyond the standard red globe at the garden center.
Major Radish Variety Categories
Five broad categories cover the cultivated radish world: spring types (small, round or oblong, harvest in 20-30 days), winter types (larger, thick-skinned, bred for storage), daikon types (long white roots, often 30 cm or more, with a mild flavor profile), fodder varieties grown for bulk biomass, and oilseed cultivars.[19][20] The size range alone is staggering: table radishes run 1-3 inches across, while the legendary Sakurajima daikon can weigh 20-45 pounds and takes about 100 days to mature.[21][5] The first time I grew Black Spanish, I genuinely laughed out loud pulling it from the bed because it looked nothing like what my brain had filed under "radish." That's when I started taking variety selection seriously.
Standout Cultivars for Home Gardens
For spring planting, Cherry Belle is the reliable workhorse: round, red-skinned, white-fleshed, ready in 22-25 days.[5] French Breakfast, an oblong red-and-white bicolor, earns its reputation specifically for slow bolting, which matters enormously in a warm spring.[5][22] I've watched French Breakfast stay tender and mild well past the point where standard red globes had already turned woody in my beds. Easter Egg mixes deliver a cheerful range of pink, purple, and white skins at 25-30 days and are especially good for gardening with kids.[5] For winter storage, Black Spanish (black skin, crisp white flesh, 50-60 days) holds in a root cellar for 2-3 months.[5] Watermelon radish is the attention-grabber: dull green-gray skin on the outside, vivid magenta-red flesh inside, and it consistently surprises people who've never cut one open.[21] Standard white daikon types, the Japanese radish most home gardeners encounter, reach 8-12 inches and beyond with consistent moisture and deep, loose soil.[23]
Choosing the Right Radish for Your Garden
The practical decision at seed-ordering time comes down to three things: your season length, your intended use, and how pungent you want your harvest. Flavor intensity shifts dramatically between types and even within the same cultivar depending on soil temperature and moisture; heat and drought push pungency way up.[21] Spring types thrive across USDA zones 3-9, while daikon varieties show better cold hardiness and can overwinter in milder climates.[23][24] Timing at harvest is non-negotiable: spring types are ready in 20-30 days, winter and daikon types in 50-70, and leaving any variety in the ground past its window means woody, overly sharp roots.[5] I start checking Cherry Belle at day 20 rather than day 25 because a few days of warm weather can close that window fast. If you're debating where to start, a spring variety like French Breakfast for the table and a daikon white radish for soil-breaking duties in a new bed is a combination that's never steered me wrong.
Radish Propagation and Planting Guide
Radish is about as close to instant gratification as vegetables get. Drop seeds in the ground, keep the soil moist, and within a week you'll see seedlings pushing up. That speed is the whole story with this crop, and it shapes everything about how you propagate and plant it.
Seed Propagation: The Only Practical Method for Gardeners
Direct seeding is the only propagation method worth your time here.[25][26] Transplanting causes root deformities, full stop. I've seen gardeners try to start radishes indoors and move them out later, and the results are always misshapen, stunted, or bolted before the root develops. The plant simply doesn't want to be disturbed. Radish is biologically designed around a short, uninterrupted sprint from germination to harvest, anywhere from 25 to 70 days depending on variety.[25] You work with that biology, not against it.
The germination speed is one of the genuine joys of growing radish. Seeds emerge in just 3 to 7 days at soil temperatures between 7 and 29°C (45 to 85°F), with the sweet spot sitting between 13 and 24°C (55 to 75°F) for the fastest, most uniform germination.[5][25] Under good conditions, germination rates run 70 to 95%.[27] Compare that to carrots, which can take two to three weeks and require serious coddling to stay moist the whole time. Radish is forgiving in a way that makes it genuinely beginner-friendly. Sow seeds just half an inch deep in loose, well-drained soil and they'll do the rest.[28][29] One practical note from years of direct sowing: I always mark my rows with a small stake right after planting, because young radish seedlings look surprisingly similar to other brassicas at that first-leaf stage and it's easy to lose track of what's what in a busy mixed bed.
Vegetative methods like grafting, cuttings, or tissue culture do exist in research contexts and can boost yield in controlled trials, but they require expertise well beyond anything useful in a home garden.[30][31] Seed is faster, cheaper, and easier than any of them. End of discussion.
Seed Characteristics, Storage, and Viability
Radish seeds are small, roughly spherical to oval, about 2 to 3 mm across, and dark brown to nearly black.[32] They're easy to handle and easy to sow, which matters when you're succession planting every two weeks through spring. The other thing working in your favor is that radish seeds have orthodox storage behavior, meaning they can be dried down and stored without losing viability.[33] Under cool, dry, dark conditions, a packet of radish seed stays viable for 4 to 5 years.[34][35] My habit is to keep seeds in airtight glass jars with a silica packet tucked inside, stored in the refrigerator. I've tested seed I stored that way across multiple seasons and seen no meaningful drop in germination rate. It's a small step that pays off every time you reach for a packet mid-spring.
Optimal Soil, Site, and Light Conditions
Soil preparation is where most radish failures actually start. After years of growing root crops, I now loosen beds to at least 12 inches before sowing, and I test pH every season. That might sound excessive for a 30-day crop, but it's not. Radishes need loose, well-drained sandy loam or loamy soil with good organic matter (ideally 3 to 4%) to form clean, uniform roots.[5][36] Compacted soil with bulk density above 1.4 to 1.6 g/cm³ physically restricts root development and leads directly to forking, pithiness, or stunted growth.[5][37] The minimum prep depth is 6 to 8 inches for small globe types, but 12 inches is safer, and daikon demands 18 to 24 inches of genuinely loose, unobstructed soil.[36]
Target a pH of 6.0 to 7.0, with tolerance out to 5.5 at the low end and 7.5 at the high end.[5] Below 6.0, aluminum toxicity can lock out nutrients; above 7.0, iron chlorosis becomes a real problem.[38] Work in 1 to 2 inches of compost before sowing and apply a balanced fertilizer at moderate rates, keeping in mind that excess nitrogen pushes leafy top growth at the expense of the root you're actually after.[5][39] For light, radishes want 6 to 8 hours of full sun, though they'll manage in 3 to 6 hours of partial shade, and in hot climates a bit of afternoon shade helps hold off bolting.[32][40]
Planting Timing, Spacing, Depth, and Technique
Sow in early spring or fall, and succession-plant every two weeks for continuous harvests through the cool season.[29] Heat above 27°C (80°F) triggers bolting, so timing your sowings around that threshold is the most important scheduling decision you'll make with this crop. For container growing, use pots at least 6 to 8 inches deep with a well-draining mix of peat or coir, perlite, and compost in roughly equal parts.[41]
Sow seeds 1 to 2 inches apart in rows spaced 12 to 18 inches apart.[5] Once seedlings reach 1 to 2 inches tall, thin them: small varieties like 'Cherry Belle' or 'French Breakfast' need 2 inches of breathing room at minimum, while daikon types want 4 to 6 inches.[42][43] I skipped thinning in my first few seasons and ended up with a bed of tiny, woody, misshapen roots that weren't worth eating. That mistake taught me more than any guide did. Crowding below 2 inches causes stunted, bitter roots; thinning early is non-negotiable.[5]
Good companions around your radish bed include lettuce, peas, beans, cucumbers, and nasturtiums, which help deter flea beetles and aphids.[44][45] Keep radishes away from potatoes, corn, and other heavy root crops where competition and shared disease pressure become a problem. Consistent moisture at 1 to 1.5 inches per week, combined with proper spacing for airflow, covers most of what prevents pithiness, bolting, and pest trouble all at once.
Seed Saving and Pollination Considerations
Most home gardeners can skip this section and just buy a fresh seed packet each spring, which is honestly what I do most seasons. Radish seed stays viable for 4 to 5 years in proper storage, so a single packet stretches across multiple seasons without any seed-saving effort on your part. The 70 to 95% germination rate you get from good commercial seed is hard to beat without careful management.
If you do want to save your own seed, the pollination biology makes it more complicated than it looks. Radishes are primarily insect-pollinated, with self-pollination rates of only 0 to 10% and cross-pollination potential exceeding 50% without isolation.[46] To keep a variety true-to-type, you'd need isolation distances of 800 meters to 1.6 kilometers between varieties.[47][48] In a typical backyard, that's simply not realistic. I've experimented with saving radish seed and found the crosses interesting but unpredictable. For the home gardener, the math doesn't favor it: a packet of quality seed costs next to nothing and removes all the isolation headaches entirely.
Radish Care Guide: Sunlight, Water, Soil, and Seasonal Needs
Radish rewards a simple philosophy: keep it cool, keep it consistently moist, and don't overthink it. The crop that goes from seed to harvest in 20-60 days doesn't demand much, but it does demand consistency. The growers who struggle with woody, pithy, or bitter roots are almost always the ones who let conditions drift, whether that's a forgotten week of watering or a late-season planting that slides into summer heat. Get the fundamentals steady, and radish essentially grows itself.
Sunlight Requirements for Optimal Root Development
Six to eight hours of direct sun per day is the practical target for a well-developed root.[49] In cooler regions, full sun all day is fine, even beneficial. In zones where temperatures climb quickly in spring, afternoon shade becomes genuinely useful, not just a nice-to-have: it slows the soil warming that triggers bolting before you've had a chance to harvest anything worth eating.
Too little light causes its own problems. Etiolated stems, yellowing leaves, and stunted root development are all signs that a radish isn't getting what it needs from the sky.[50] On the other end, excessive light intensity combined with temperatures above 77°F pushes the plant into photoinhibition, leaf scorch, and accelerated bolting.[51] The sweet spot is bright, consistent light during cool temperatures, which is exactly why radish is a spring and fall crop rather than a summer one.
Watering Needs and Soil Moisture Management
Uneven moisture is the most common reason home gardeners get woody or split radishes. I water deeply but infrequently once plants are established, and it makes all the difference in root quality. The target is 1 to 1.5 inches per week, with soil that feels like a wrung-out sponge at the 2-inch depth.[5] Surface dryness can be deceptive, especially in sandy soils, so I always check a couple of inches down before deciding whether to water.
Let the soil dry out for a week or more and you'll pay for it: wilting, cracked or forked roots, bitterness, and pithiness are all drought stress signatures, and a 7 to 10 day deficit can cut yield by 20 to 50 percent.[52] But waterlogged soil is no better. Yellowing leaves, stunted growth, and root rot follow overwatering, especially when drainage is poor or you're using overhead sprinklers that keep foliage wet.[53] The stage-by-stage approach I use: light daily moisture for fresh seedlings, deep watering every 2 to 3 days during active vegetative growth, then backing off by about half in the final week before harvest to firm up the root.[54] Morning wilting is my early warning signal; if a radish bed looks droopy at 7am, it's asking for water today, not tomorrow.
Fertility and Nutrient Management
Early in my gardening career I fertilized radishes the way I fertilized tomatoes: generously and often. The result was genuinely impressive foliage and marble-sized roots that weren't worth harvesting. Radishes are moderate feeders, and keeping nitrogen in check is the central lesson.[55][56] I always start with a soil test now, because guessing leads to either tiny roots from low fertility or lush, useless tops from too much nitrogen. A pre-planting application of balanced fertilizer like 5-10-10 or 10-10-10 at 1 to 2 pounds per 100 square feet gives a reliable foundation, adjusted by whatever the test reveals.[57]
Deficiency symptoms follow predictable patterns once you know what to look for. Nitrogen shortage shows as yellowing starting at the tips and margins of older leaves, with stunted, underdeveloped roots. Phosphorus deficiency produces a purplish-red cast on older foliage. Potassium shortage causes marginal scorch and woody roots.[58][59] Micronutrients matter too: boron deficiency in particular causes cracked, hollow roots, something I've seen in beds that hadn't been amended in years. A targeted boron application corrected it the following season.[60][61] Adequate potassium specifically improves root crispness, firmness, and disease resistance, while excess fertilizer of any kind leads to salt buildup, tip necrosis, and pithy or bitter roots.[25] The soil pH sweet spot sits at 6.0 to 7.0; outside that range, nutrient availability shifts regardless of what you've applied.
Frost and Heat Tolerance
Radish is a legitimately frost-tolerant cool-season crop. Mature plants handle brief light frosts down to about 25°F without serious damage, and the roots themselves are hardier than the foliage.[62] Winter types like daikon can tolerate brief exposures approaching 23°F with some protection, though seedlings are considerably more vulnerable than established plants.[36] Sustained cold below 28°F starts causing real foliage damage, blackened leaf edges and water-soaked lesions, and prolonged exposure well below 20°F risks pitting, cracking, and bitterness in the root itself.[63] For germination, soil temperatures need to reach at least 40 to 45°F, which is why planting 3 to 4 weeks before the last frost date works so reliably across USDA zones 2 through 11.
Heat Stress and Bolting Prevention
Radishes bolt even faster than my spring lettuce once temperatures climb above 75°F. Root development is optimal between 50 and 70°F, and sustained heat above 75°F triggers bolting, pithiness, and a sharp drop in quality.[64] Push above 77°F and you get wilting, chlorosis, scorching, and physiological stress that stunts or ruins the root before you've had a chance to harvest.[65][66] The seedling and flowering stages are the most vulnerable windows; bolting is most readily triggered by sustained heat above 77 to 86°F combined with long days.[67] Some heat-tolerant varieties hold on if nights cool below 59°F, but for most spring plantings, the practical answer is simply to time your crop so it matures before the heat arrives.
Seasonal Rhythm and Maintenance
The beauty of radish maintenance is how little of it there is. No pruning, no staking, no trellising required.[68] The real work is timing: planting into the cool season, sowing a fresh row every 2 to 3 weeks to stay ahead of the heat, and harvesting on time.[5] In practice, the biggest mistake I see is forgetting radishes in the ground. They go from perfect to pithy in a week once they hit maturity, so once the 20-day mark arrives I'm checking the beds every few days. Flea beetles deserve attention through the season; row covers at planting and neem-based IPM keep them manageable without reaching for anything harsh. After harvest, roots hold well at 32°F with high humidity for 2 to 4 weeks if you need to store them.[69] The whole system is really just: cool temperatures, steady moisture, modest fertility, and attentive timing. Nail those, and radish does the rest.
When and How to Harvest Radishes
Radishes are a cool-season crop through and through, and their entire harvest window is governed by temperature. They grow best between 50-75°F and will bolt fast once temperatures push consistently above 80°F.[5][70] That's why peak harvest seasons in the U.S. run spring (April through June) and fall (September through November).[5] Work with those windows and you have a fast, rewarding crop. Fight them and you'll be pulling pithy, searingly hot roots wondering what went wrong.
Timing, Visual Cues, and Cultivar Differences
How fast a radish matures depends heavily on which type you're growing. Common red globe varieties are ready in 20-30 days, French Breakfast types in 25-30, and daikon can take 50-60 days.[71][72] For red and French Breakfast types, you're looking for roots at 1-2 inches in diameter; daikon should reach 4-6 inches across or 6-12 inches long before pulling.[5][73]
Once I see those colorful shoulders starting to push up above the soil line, I'll gently tug a test root to check diameter and firmness. A harvest-ready radish has smooth, uncracked skin and snaps cleanly when bent; if it feels spongy or the flesh seems soft, that root is already past its best.[5][74] I've watched a perfect 1-inch red globe turn woody and fiercely hot in just four extra days of warm weather, so once my beds hit the 20-day mark I'm checking every couple of days without fail.[5] The difference between perfect and past-it is measured in days, not weeks, and I also pull only when the soil is moist to avoid breaking crisp roots in dry, compacted ground.
Flavor, Texture, and What Affects Radish Quality at Harvest
Here's the chemistry behind what you're tasting: radish pungency comes from glucosinolates that break down into isothiocyanates when the root is cut or bitten, and that reaction intensifies as the root ages past its prime.[75][76] A perfectly timed harvest gives you that crisp, juicy texture with a peppery bite that lingers a minute or two -- the sinus-clearing sensation that reminds me of fresh wasabi or grated horseradish, which makes sense since all three plants share the same sulfurous compound family.[76][77]
The cultivar matters too. Red globes hit the hardest, with the highest glucosinolate levels and the most assertive heat. French Breakfast types are mildly peppery with a hint of sweetness. Daikon is noticeably milder and sweeter than both.[78][79] My spring harvests -- pulled in cool soil before the heat arrives -- are consistently sweeter and more delicate than anything I pull once temperatures climb. Cooler conditions, fertile soil, and timely harvest all dial pungency down; heat, stress, and delay ratchet it back up.[80][81] That snap of a just-right radish, crisp and bright and just fiery enough, is genuinely one of the best small rewards this garden has to offer.
Radish Preparation and Uses
Culinary Uses and Flavor Transformations
What I love about radish is that you eat the whole thing. Roots, leaves, flowers, crisp seed pods, sprouts: every part is edible and genuinely useful in the kitchen.[82][83] That matters in a permaculture kitchen where nothing goes to the compost if it can go to the plate first.
The peppery bite that defines raw radish comes from glucosinolates breaking down into isothiocyanates the moment you slice or chew the tissue.[84] Heat changes the equation dramatically. I roast globe radishes from my garden at around 400°F for 20 minutes, and the result is genuinely surprising: the sharp bite retreats, a mild sweetness emerges, and the texture turns almost turnip-like. Roasting can reduce glucosinolates by up to 50%, which is what drives that flavor shift.[85] Fermentation takes a different path: a classic daikon radish pickle keeps the crunch intact while developing tangy, complex notes that raw radishes never quite reach.[86][87]
That culinary range is ancient. Romans ate radishes raw, pickled, and in soups; daikon appears in Japanese and Korean ferments, stews, and stir-fries; Indian mooli shows up raw in salads or folded into curries.[76][88] I've grown rat-tail radishes alongside standard globe types, and the pods are their own category entirely: crisp, spicy, and remarkably long-lasting in humid Florida summers where most greens wilt by July. Those pods work beautifully in Indian-style stir-fries, Chinese salads, or simply pickled in a daikon radish pickle brine with ginger and rice vinegar.[89]
For simpler preparations: French breakfast radishes with good butter and flaky salt are still one of my favorite snacks, and thinly sliced daikon with soy and fresh ginger alongside grilled fish is a Japanese radish recipe that takes five minutes and earns compliments every time.[90][91]
A few practical safety notes: wash roots and leaves well to remove soil, use 5% acidity vinegar or active lactic fermentation when pickling to bring pH below 4.6.[92] Sprouts carry elevated microbial risk; I soak seeds briefly in a dilute vinegar solution before rinsing when sprouting, then rinse thoroughly. Radish leaves contain oxalates at lower levels than spinach, and goitrogenic compounds in all cruciferous parts are substantially reduced by cooking or fermentation, so I always lightly cook greens when serving family members with thyroid concerns rather than skipping them entirely.[93]
Traditional Medicinal Preparations
Folk medicine traditions have long used radish as a digestive aid and expectorant, and many everyday preparations already deliver gentle versions of those effects: sipping a leaf infusion or eating raw roots regularly falls within the same territory as more formal traditional dosing.[94] Formal traditional preparations include root decoctions (roughly 10-30 g dried root simmered in 500 ml water), leaf or seed infusions (5-10 g in 250 ml hot water), 1:5 tinctures, and seed powder at 1-3 g per dose, though dosages vary considerably by tradition and condition.[95] If you're using radish therapeutically beyond a daily food, talking with a healthcare professional is worth the conversation.
Non-Food and Ecological Uses
Radish's ecological resume is genuinely impressive for such a small, fast plant. As a cover crop, its taproot breaks soil compaction, scavenges minerals, and produces glucosinolates that suppress weeds and soilborne pathogens when incorporated as green manure.[5] The flowers attract pollinators reliably, and the root mass helps stabilize bare soil against erosion. I use rat-tail varieties along garden borders specifically because the tall, flowering stems pull in beneficial insects while the dangling pods give the bed a sculptural quality that surprises visitors who've never seen radish grown to full expression.
Radish seed oil, extracted from mature seeds and rich in unsaturated fats and antioxidants, has applications in cooking, salad dressings, and cosmetics.[96] It's a minor crop use in most home gardens, but worth knowing if you're growing oilseed types and wondering what to do with a surplus of mature seeds.
Radish Health Benefits and Medicinal Uses
Radish earns its place in the medicinal plant conversation not because of any single standout nutrient, but because of what happens when you bite into one. That sharp, sinus-clearing pungency is chemistry at work, and it's the same chemistry driving most of what researchers find interesting about this plant.
Key Phytochemicals in Radish: Glucosinolates, Isothiocyanates, and Phenolics
Radish roots are rich in glucosinolates, the sulfur-containing secondary metabolites that define the Brassicaceae family. The main players in radish roots are glucoraphasatin and glucoraphenin, alongside gluconasturtiin, glucobrassicin, sinigrin, and glucoerucin, with concentrations sometimes exceeding 0.5% dry weight in roots.[97][98] On their own, glucosinolates are fairly inert. The action starts when you damage the tissue: chopping or chewing triggers the enzyme myrosinase, converting glucosinolates into bioactive isothiocyanates including sulforaphene and allyl isothiocyanate.[97][99] These compounds are responsible for the pungency, yes, but also for phase II detoxification enzyme induction, antioxidant activity, antimicrobial properties, and the anticancer effects that show up repeatedly in the literature.
I've grown radishes year-round in Central Florida, and I can tell you that the ones coming out of hot, dry summer conditions are almost aggressively sharp compared to my mild spring crop. That intensity tracks with a 2015 study in Plant and Soil showing that glucosinolate content peaks under heat stress and declines with heavy nitrogen fertilization.[100][101] When I'm chopping those heat-stressed roots for a salad or getting ready to ferment a batch, I'm almost certainly getting more isothiocyanate activity than I would from a commercial radish grown fast and fat on a high-nitrogen drip line.
The phytochemical picture extends well beyond glucosinolates. Radish leaves are rich in phenolic acids, with chlorogenic acid alone accounting for up to 60% of total leaf phenolics; quercetin, kaempferol, isorhamnetin, and related flavonoids are distributed across plant parts; and colored varieties stack anthocyanins on top of all that.[97][102] Roots lead on glucosinolates, leaves lead on phenolics, and seeds carry a moderate share of both plus phytosterols. This is a plant where the whole anatomy contributes, not just the root you pull out of the ground.
Nutritional Profile of Radish
Raw radish comes in at about 16 calories per 100 grams, with 95 grams of that being water.[103] Compared to broccoli or kale, it's not going to dominate anyone's nutrient-density chart. But I reach for radishes from my garden far more often than I reach for either of those, and there's a case to be made for the everyday workhorse vegetable you actually eat versus the superfood that wilts in the crisper. Per 100 grams, you get around 15 mg of vitamin C (roughly 16% of the daily value), 25 mcg folate, modest potassium at 233 mg, 25 mg calcium, and 1.6 grams of fiber.[103][104]
How you prepare radish changes the bioactive math significantly. Boiling reduces glucosinolates by 50 to 70%, though vitamin C holds up better because it's less heat-sensitive than you'd expect from boiling.[105] Pickling preserves glucosinolates well and keeps vitamin C around 15 mg per 100 grams, though sodium climbs considerably. If you're eating radish primarily for the bioactive compounds, raw or fermented is the better delivery method; if goitrogenic potential is a concern, cooking is the practical fix.
Medicinal Research and Traditional Uses
Healers across multiple traditions worked out a version of this plant's pharmacology long before anyone ran an in-vitro assay. In Ayurveda, radish root was used for digestive issues, urinary disorders, hemorrhoids, and detoxification; TCM employs the seeds, known as Lai Fu Zi, to descend qi, resolve phlegm, and treat food stagnation; Iranian traditional medicine has long used it as a liver and kidney tonic and cholagogue for jaundice.[106][107] The convergence across geographically separate systems is the kind of pattern that makes ethnobotanical evidence worth taking seriously.
Modern research has landed most firmly in three areas: antioxidant activity, anti-inflammatory effects, and antimicrobial properties. Radish extracts activate the Nrf2 pathway, upregulating antioxidant enzymes; in macrophage studies, LPS-induced nitric oxide production was reduced by up to 76%, with NF-κB inhibition suppressing inflammatory cytokines including TNF-α, IL-6, and IL-1β.[108][109] Against pathogens, sulforaphene and allyl isothiocyanate show antimicrobial activity against E. coli and S. aureus with in-vitro MICs often below 100 μg/mL. Furthermore, anticancer potential through apoptosis induction in breast and colon cancer cells, alpha-glucosidase inhibition in rodent diabetes models, and hepatoprotective effects round out the preclinical picture.[110][111][112]
The honest caveat here is that most of this data comes from in-vitro and animal studies, often using sprout extracts at concentrations you won't reach eating table radishes at dinner.[113][114] Sprouts do carry higher bioactive concentrations than mature roots, and conditions at harvest affect levels considerably. Human clinical trials are limited and often inconclusive. Culinary use in the 50 to 100 gram daily range is the sensible baseline, not a therapeutic dose.
Safety Considerations for Radish Consumption
Radish is low-toxicity food at normal dietary amounts and all parts are edible: roots, leaves, pods, seeds, and sprouts.[115][116] Young seedlings and stressed plants have the highest glucosinolate levels, which can cause mild GI irritation or flatulence if you eat large amounts raw, but at a few handfuls a day you're unlikely to notice anything beyond normal digestive traffic.
Goitrogenic potential is the concern that comes up most in the thyroid community. The glucosinolates that make radish medicinally interesting can interfere with iodine uptake, particularly with high raw consumption in people who are iodine-deficient or already managing hypothyroidism.[117][118] Cooking substantially mitigates this. I always recommend sautéing or lightly steaming radish greens for anyone with thyroid concerns; the bitterness softens, the goitrogenic compounds drop, and the greens become genuinely pleasant rather than medicinal-tasting.
A few interactions deserve specific mention. Radish leaves contain vitamin K, and inconsistent consumption can affect anticoagulant therapy; I've told friends on warfarin to keep their radish intake steady week to week rather than swinging between none and large quantities, because consistency is what matters with vitamin K and blood thinners, not avoidance.[119] Radish also shows hypoglycemic effects in animal models, so if you're managing blood sugar with medication, it's worth monitoring; seed extracts can induce CYP1A1, CYP1A2, and CYP1B1 enzymes affecting drug metabolism, and seed use should stay under about 6 grams daily to avoid gastric irritation.[120]
On the allergy front: reactions are uncommon but real, typically oral allergy syndrome in people sensitive to birch or mugwort pollen, and cooking usually resolves symptoms.[121] Sprouts carry bacterial risk if conditions aren't right; after growing my own many times, the lesson I've internalized is that rinsing thoroughly and maintaining airflow during sprouting are non-negotiable, not optional steps.[122] Radish roots can also bioaccumulate heavy metals from contaminated soil, so if you're growing in urban fill or near industrial sites, get a soil test before you plant anything edible in that ground.[123] Oxalic acid content is low at 10 to 20 mg per 100 grams, so that's not a meaningful concern for most people.
Radish Pests and Diseases
Radish has a genuine advantage that slower brassicas like cabbage and broccoli simply don't get: speed. Its 30-60 day life cycle lets it outrun many soil-borne pathogens before they build up enough pressure to cause serious damage.[124][125] That said, "moderate overall disease resistance" isn't the same as no diseases, and a handful of pests can genuinely ruin a crop if you're not watching.
Common Diseases and Resistance Levels
The disease picture is mixed but manageable. Radish handles downy mildew reasonably well, but it's susceptible to powdery mildew, bacterial soft rot, white mold, and mosaic viruses.[126] Black rot is the one I'd flag as high-concern in humid conditions: most standard cultivars have low resistance, though 'Cherry Belle' shows partial tolerance if you're in a region where it's a recurring problem.[126][127] Fusarium wilt resistance varies by breeding line,[126] and white rust susceptibility ranges from moderate to high depending on the variety.[126]
Clubroot deserves special attention in acidic soils. It thrives at pH 5.0-6.5 and weakens significantly when you push soil pH above 7.2.[128] I test pH before planting brassicas in any new bed now, after losing a crop to acidic soil early in my gardening years before I understood that connection. Oilseed cultivars like 'AC Hamilton' and 'AC Reston' have been specifically bred for clubroot resistance if you're in a known problem area.[129] Damping-off from Pythium is primarily a seedling-stage issue in cool, wet soils around 10-20°C; good drainage and avoiding overwatering right after germination goes a long way.[130] Breeding programs are steadily developing hybrids with stacked resistance to these worst offenders.[131]
Major Insect Pests and Natural Defenses
Cabbage root maggot (Delia radicum) is the pest most likely to ruin a radish crop outright. The larvae tunnel directly into the root and render it unmarketable and bitter.[132][133] In my experience, even 20-30% tunneling doesn't always mean total loss if you catch it early and harvest promptly, but it's not a pest to shrug off. Tougher-skinned types like 'Round Black Spanish' show some tolerance, which is one reason I grow them in spring when maggot pressure peaks.[132]
Flea beetles cause that characteristic shot-hole damage on seedling leaves, but radish's fast growth means plants usually recover with minimal yield loss.[132] I've grown 'Cherry Belle' and 'French Breakfast' side by side with hairier varieties and consistently seen less flea beetle feeding on the smooth-leaved types; the glabrous foliage genuinely seems to deter them.[134] Aphids, cabbage loopers, and slugs round out the common pest list,[132][132] along with the occasional wireworm, leafminer, and root-knot nematode in affected soils.[135]
What gives radish a fighting chance against all of these is its glucosinolate-myrosinase system, which releases toxic isothiocyanates the moment tissue is damaged. It's the same chemistry behind the peppery bite you taste in a fresh radish from the garden; physical trichomes on leaf surfaces add to the deterrence and can reduce pest feeding or egg-laying by up to 50%.[136]
Integrated Pest and Disease Management
Prevention is genuinely where radish IPM starts and, most of the time, finishes. A 3-4 year rotation away from brassicas, removal of crop debris, proper spacing, and keeping soil pH above 7.2 handle the majority of disease pressure before it starts.[137][55] For root maggots specifically, floating row covers reduce infestation by up to 90%, and planting early in the season helps seedlings get ahead of flea beetle emergence.[138] I rarely need anything beyond row covers on my spring plantings when I combine them with bed rotation; losing that first crop to maggots years ago was the lesson that made me a convert.
On the biological side, encouraging parasitic wasps and ladybugs helps with aphid pressure, beneficial nematodes (Heterorhabditis bacteriophora) target root maggot larvae in the soil, and Bt handles caterpillars if they get out of hand.[139][140] Chemical intervention is genuinely a last resort here; if you do reach for something, spinosad or pyrethrin used at the IPM threshold (around 10-20% defoliation for flea beetles) and rotated to prevent resistance is the approach.[141] Your local extension office will have the most accurate regional pest pressure data, which matters because what overwhelms a radish bed in the Pacific Northwest damp can be a non-issue in the arid Southwest.
Radish in Permaculture Design
Most people think of radish as a salad crop you grow when you've run out of patience for everything else. After years of designing polycultures and food forests, I've come to see it as something more interesting: a fast-deployed ecological workhorse that earns its place in a system long before you ever pull a root. It's genuinely one of the few annuals I reach for when I need results in weeks, not years.
Ecosystem Functions and Soil Health Benefits
The magic starts with the taproot, which drives down up to three feet to physically fracture compacted layers and pulling up minerals like potassium, calcium, phosphorus, and sulfur that shallower-rooted plants can't reach.[142][4] When I'm establishing a new bed on former lawn or tired, compacted soil, I'll often run a round of radish before planting anything else. When those roots die back and decompose, the soil is noticeably fluffier, almost as if someone had run a broadfork through it. That's not a metaphor; you can feel the difference when you push your hand in.
The biofumigation effect is equally compelling. When radish tissue breaks down, glucosinolates in the plant release isothiocyanates into the soil, suppressing weeds, soil-borne pathogens, nematodes, and pests like root maggots and wireworms.[143][142] It's essentially a slow-release soil amendment that also functions as a targeted pest suppressant, without a spray in sight. On slopes, the fibrous root system stabilizes soil against erosion and runoff during the same window.[144]
As a companion plant for radish's neighboring species, legumes are the obvious first choice. Radish handles the mechanical work of breaking up compacted subsoil while a legume fixes atmospheric nitrogen above and below it, and planting radish after legumes in rotation helps interrupt the pest and disease cycles that plague brassica-heavy polycultures.[145] I think of them as complementary functions: the nitrogen-fixer feeds the soil biology while the radish rearranges the furniture.
Let a radish planting bolt and you get a secondary benefit most growers never see. The small cruciform flowers, white to pale yellow, draw honeybees, bumblebees, solitary bees, and flies consistently.[146][147] Radish is highly prone to cross-pollination, meaning seed savers typically need to isolate varieties if they want to keep them true-to-type.[148][147] But in my saved-seed beds where I've interplanted borage and phacelia nearby, bee activity noticeably increases, and the seed set improves with it. That aligns with the research showing pollinator limitation can reduce yields 20-50% in seed production contexts.[149] If you want quantity and genetic diversity in your seeds, the bees matter.
Climate Preferences and Growing Zones
Radish is a cool-season crop in the most literal sense: its sweet spot runs between 50 and 70°F (10-25°C), growth slows noticeably below 41°F (5°C), and quality deteriorates fast above 75°F (25°C).[150][5] The good news is that USDA zones 2 through 11 can all produce radishes; you're just working with very different seasonal windows depending on where you are.[4] Germination is most reliable when soil temperatures sit between 55 and 75°F, though seeds will sprout from around 40°F upward if you're patient.[151]
In warm zones (8 through 11), the growing window shifts to fall, winter, and early spring. I learned the hard way that pushing into late spring in a humid subtropical climate means a heat spike can turn a promising planting woody and eye-wateringly spicy within days of bolting. Now I follow a strict succession schedule, sowing every 10 to 14 days and pulling plantings at the first sign of bolting rather than hoping for a few more roots.[152] Thirty to fifty percent shade cloth buys time in heat, and mulching helps regulate soil temperature in both directions.[5] In cooler zones (2 through 4), the approach flips: sow two to four weeks before the last frost date, use cold frames to extend the back end of the season, and take advantage of the fact that mature plants can survive brief dips down to around 25-28°F.[5]
Water needs are moderate, roughly one to one and a half inches per week, and radish prefers consistent moisture over feast-famine cycles.[153] I always use drip or basal watering rather than overhead irrigation on brassicas generally; keeping foliage dry is one of the simplest ways to stay ahead of fungal disease, especially in humid conditions where the preferred 40-60% humidity threshold can tip over quickly.[154]
Pollination Ecology and Management
Because radish self-pollinates reliably, most growers never have to think about pollination management for a root crop harvest. Seed production is a different calculation. Optimal conditions for pollinator visits run between 60 and 75°F with moderate humidity and full sun; broad-spectrum pesticides will suppress visitation enough to meaningfully cut seed yields.[149][155] In a well-designed permaculture system, you're generally not spraying broad-spectrum anything, so this takes care of itself. Integrating radish into guilds alongside borage, phacelia, or other insectary flowers amplifies both radish seed set and habitat for beneficials serving the rest of the polyculture.[156] It's one of those compound benefits that emerges from thoughtful companion planting rather than any single intervention.
Role in Forest Layers and Guilds
Radish didn't evolve in woodland. It's an annual herb topping out at six to eighteen inches, native to open Mediterranean and possibly Southeast Asian environments, and it has no natural role in a closed forest canopy.[157][158] That's not a flaw; it just defines where and how to use it. In food forest design, I place radish at the ground layer of newly established edges and clearings, specifically because those spots lack the quick pioneer function that a mature forest would already have covered. It compares to comfrey in terms of its mineral-accumulating role, but where comfrey is a long-term perennial investment, radish delivers that benefit in 20 to 60 days and then gets out of the way.[159]
In alley cropping systems and guild establishment phases, radish functions as a living soil amendment: it aerates, accumulates, biofumigate, and suppresses weeds between slower-establishing perennials.[160] I think of it as borrowed agriculture deployed in service of the forest. Once the canopy closes and perennial ground covers establish, radish's role naturally phases out. Until then, it's one of the most productive tools I've found for turning a problem patch of compacted or weedy soil into something that actually works for the system taking root around it.
The Crop I Always Underestimated
I spent years treating radishes as filler, something to tuck in while I waited for the real crops to establish. Then I watched a stand of daikon quietly crack through clay that had defeated my broadfork, and I started paying closer attention. They're not humble at all, really. They're just fast, and we tend to mistake speed for simplicity.
Sources 160
- Raphanus sativus - Wikipedia ↩
- The Radish (Raphanus sativus L.): A Crop with Multiple Origins ↩
- Radish - Raphanus sativus ↩
- USDA PLANTS Database - Raphanus sativus ↩
- Radish Life Cycle - University of Minnesota Extension ↩
- Missouri Botanical Garden - Raphanus sativus ↩
- Raphanus caudatus - Wikipedia ↩
- Raphanus caudatus - Kew Royal Botanic Gardens ↩
- Wild Radish (Raphanus raphanistrum) - UC IPM ↩
- The Cultural History of Radishes - Smithsonian Gardens ↩
- Radish (Raphanus sativus) - History and Uses ↩
- Culpeper's Complete Herbal ↩
- Glucosinolates in Brassica Vegetables: The Influence of the Environment ↩
- Glucosinolates in Brassica Vegetables ↩
- Oilseed Radish as a Cover Crop ↩
- Radish (Raphanus sativus L.) as a Cover Crop ↩
- Phytoremediation Potential of Radish for Cadmium-Contaminated Soils ↩
- Genetic diversity and population structure of cultivated radish ↩
- Missouri Botanical Garden Plant Finder ↩
- USDA PLANTS Database - Raphanus sativus ↩
- Raphanus sativus (Garden Radish) ↩
- Seed Savers Exchange - Heirloom Radish Varieties ↩
- Daikon Radish Production ↩
- USDA PLANTS Database: Raphanus sativus ↩
- Radish Production Guide ↩
- Raphanus sativus ↩
- Radish Growing Guide ↩
- Radish Production ↩
- Growing Radishes ↩
- Vegetative Propagation of Radish (Raphanus sativus L.) ↩
- Grafting for Disease Resistance in Radish ↩
- Raphanus sativus (Radish) ↩
- Seed Storage Behaviour: Describing and Investigating the Relationship Between Seed Moisture Content and Seed Longevity ↩
- Seed Longevity and Storage Guidelines ↩
- Storing Vegetable Seeds ↩
- Radish: How to Grow ↩
- Soil Management for Root Vegetables ↩
- Soil pH and Nutrient Availability for Vegetables ↩
- Radish Cultivation - University of Maryland Extension ↩
- Radish Production Guidelines ↩
- Container Vegetable Gardening: Radishes ↩
- Radish Varieties and Planting Guide ↩
- University of California Agriculture & Natural Resources ↩
- Radish Companion Planting Guide ↩
- Companion Planting for Radishes ↩
- Pollination Ecology of Radish (Raphanus sativus) ↩
- Seed Saving for Garden Vegetables ↩
- Organic Seed Production Manual ↩
- Radish Production - North Carolina State University Extension ↩
- Raphanus sativus Profile - Missouri Botanical Garden ↩
- Light Stress in Vegetables ↩
- Radish Cultivation - Missouri Botanical Garden ↩
- Growing Radishes in the Home Garden - UC Agriculture and Natural Resources ↩
- Radish Growing Guide - Royal Horticultural Society ↩
- Radish Production Guidelines - UC IPM ↩
- Fertilizer Recommendations for Vegetable Crops - Cornell ↩
- Radish in the Home Garden - UF/IFAS Extension ↩
- Nutrient Deficiency Symptoms in Radish - UC ANR ↩
- Mineral Nutrition of Radish - Purdue Extension ↩
- Micronutrient Deficiencies in Root Crops - FAO ↩
- Micronutrient Deficiencies in Radish - Taylor & Francis ↩
- Frost Tolerance of Vegetables - University of California Agriculture ↩
- Cold Injury in Vegetables - North Carolina State University Extension ↩
- Temperature Effects on Radish Growth and Development ↩
- Heat Stress Effects on Radish Growth and Physiology ↩
- Physiological Responses of Radish to High Temperature Stress ↩
- Bolting in Root Crops: Impact of Environmental Stressors ↩
- Radish Pest Management - UC IPM ↩
- Radish Production Handbook - Michigan State University ↩
- Milky White Radish Cultivation (Raphanus sativus) ↩
- Radish Growing Guide - The Old Farmer's Almanac ↩
- Growing Daikon Radishes ↩
- Radishes: Growing Tips, Varieties, and Care ↩
- Radishes: Harvest and Storage ↩
- Influence of Maturity and Harvest on Radish Quality ↩
- Radish - Wikipedia ↩
- Volatile Compounds in Radish (Raphanus sativus L.) ↩
- Understanding Radish Varieties and Flavors ↩
- Cultivar Differences in Radish Flavor Profiles ↩
- Glucosinolates in Brassica Vegetables: The Influence of the Environment ↩
- Flavor Chemistry of Radishes ↩
- Radish (Raphanus sativus) - Missouri Botanical Garden ↩
- Radish Leaves and Pods Edibility - Specialty Produce ↩
- Effect of Cooking on Glucosinolates and Isothiocyanates in Radish ↩
- Effect of Cooking on Glucosinolates in Radish ↩
- Sensory and Volatile Profile of Pickled Radish ↩
- Texture of Fermented Radish in Kimchi ↩
- The Radish in History and Culture ↩
- Journal of Ethnopharmacology (2007). 'Ethnobotanical survey of Raphanus caudatus in Indonesia' ↩
- Radish Culinary Uses and Pairings ↩
- Daikon Radish Recipes with Ginger ↩
- National Center for Home Food Preservation - Pickling Vegetables ↩
- Goitrogenic Foods and Thyroid Health ↩
- Medicinal Plants of the World ↩
- WHO Monographs on Selected Medicinal Plants ↩
- Raphanus sativus - USDA PLANTS Database ↩
- Phytochemical Profile of Raphanus sativus: A Review ↩
- Glucosinolates in Brassica Vegetables: The Nutritional and Health Implications ↩
- Secondary Metabolites of Radish: Bioactive Compounds and Health Benefits ↩
- Cultivar-Dependent Variation in Glucosinolate Content of Radish (Raphanus sativus L.) ↩
- Effects of Growth Stage and Nitrogen Fertilization on Glucosinolates in Radish ↩
- Flavonoids and Phenolic Acids in Radish (Raphanus sativus L.) ↩
- USDA FoodData Central - Radishes, raw ↩
- Ravishankar et al. (2019). Radish bioactive compounds and health benefits ↩
- Glucosinolates in Brassicaceae: Cooking effects ↩
- Radish (Raphanus sativus L.): A Review of Its Medicinal Properties ↩
- Traditional Uses and Phytochemistry of Raphanus sativus ↩
- Pharmacological Potential of Radish (Raphanus sativus L.) ↩
- Anti-inflammatory and antioxidant effects of radish (Raphanus sativus L.) sprouts ↩
- Antimicrobial Properties of Radish Extracts ↩
- Anticancer Potential of Radish: Focus on Glucosinolates ↩
- Anti-diabetic and Antimicrobial Effects of Raphanus sativus ↩
- Bioactive Compounds and Biological Activities of Radish (Raphanus sativus L.) ↩
- BMC Complementary Medicine and Therapies ↩
- USDA PLANTS Database Profile: Raphanus sativus ↩
- Toxicity and Safety of Radish Greens and Sprouts ↩
- Goitrogenic Effects of Cruciferous Vegetables Including Radish ↩
- Raphanus sativus L. (Radish): Botany, Taxonomy, Chemical Constituents, Medicinal Uses and its Health-Promoting Effects ↩
- Interactions of Cruciferous Vegetables with Anticoagulant Therapy ↩
- Effect of Radish Seed Extract on Cytochrome P450 Enzymes ↩
- Oral Allergy Syndrome ↩
- Sprouts and Foodborne Illness ↩
- Bioaccumulation of Heavy Metals in Radish (Raphanus sativus L.) ↩
- Radish Production in the Home Garden ↩
- Raphanus sativus (Garden Radish) - Summary Report ↩
- Diseases of Radish and Their Management ↩
- Radish Cultivars for Black Rot Resistance ↩
- Clubroot of Crucifers: Biology and Control ↩
- Development of Clubroot-Resistant Radish Cultivens ↩
- Damping-Off Diseases of Radish ↩
- Breeding for Disease Resistance in Radish ↩
- Crops: Radish - UC IPM ↩
- Cabbage Root Maggot Management ↩
- Raphanus sativus - Plant Finder ↩
- Radish (Raphanus sativus L.)-Insect and Mite Pests ↩
- Glucosinolates and the Glucosinolate–Myrosinase System in Pest–Multitrophic Interactions ↩
- Radish Production and Pest Management ↩
- Integrated Pest Management for Radish ↩
- Biological Control Options for Vegetable Pests ↩
- Pest Control for Radishes ↩
- Radish Pest Management ↩
- SARE - Cover Crop Radish for Soil Health ↩
- Glucosinolates and Biofumigation ↩
- Erosion Control with Cover Crops ↩
- Crop Rotation Benefits for Root Vegetables ↩
- Cover Crop Profile: Radish ↩
- Pollinator Profile for Raphanus sativus ↩
- Raphanus sativus L. ↩
- Pollinator Limitation in Radish (Raphanus sativus L.) Seed Production ↩
- Radish Production - USDA National Agricultural Library ↩
- Radish | College of Agricultural Sciences - Penn State University ↩
- Radish Production Guide for Commercial Growers - University of Florida IFAS ↩
- Radish Production - UC Agriculture and Natural Resources ↩
- Radish (Raphanus sativus) - Missouri Botanical Garden ↩
- Impact of Pesticides on Pollinator Visitation to Radish Flowers ↩
- Pollinator Dynamics in Brassicaceae Crops ↩
- Raphanus sativus ↩
- Köppen Climate Classification and Radish Cultivation ↩
- Cover Crop Strategies: Radish ↩
- Biofumigation with Brassica Species ↩
About the Author
Farmer Noelle has been farming for over 12 years between Washington and Michigan. Her experience ranges from small-scale biointensive operations to a 40-acre CSA with over 300 members.