Garlic has been pulled from the ground for at least 6,000 years, and somewhere in that long history someone figured out that if you crush a clove, the smell changes completely. That's not a coincidence or a curiosity; it's a biochemical alarm system firing in real time. The moment you break a cell wall, an enzyme called alliinase converts a dormant compound into allicin, the sulfurous molecule responsible for the burn on your fingers, the sting in your eyes, and, as it turns out, the inhibition of certain antibiotic-resistant bacteria.[1] The plant essentially weaponizes itself the second you wound it. And we've been exploiting that defense mechanism in our kitchens and medicine chests for longer than most civilizations have existed.
What I find quietly remarkable is how little most gardeners know about the plant they're actually growing. It's not a simple annual. It's a domesticated perennial that we force into an annual cycle, a clonal crop so thoroughly shaped by human selection that most varieties can't reproduce sexually anymore. Every bulb you plant is a genetic copy of one planted centuries before it. That kind of deep entanglement between a plant and the people who grow it changes how I think about putting cloves in the ground each October, and it might change how you think about it too.
Origin and History of Garlic
Botanical Background and Origins
Few cultivated plants carry as much history in a single bulb as garlic. Allium sativum, the garlic scientific name most of us never bother to learn, traces its roots to a broad swath of Central Asia, from the mountain ranges of Uzbekistan and Kyrgyzstan through northern India and parts of Siberia, with its closest wild relative thought to be Allium longicuspis.[2][3] Human hands began shaping this plant roughly 5,000 to 7,000 years ago during the Neolithic period, making it one of the oldest deliberately cultivated food crops we know of.[4] Millennia of vegetative selection have so thoroughly blurred its wild range that untangling exactly where garlic grows naturally versus where it escaped cultivation is genuinely difficult today.
Technically, garlic is a bulbous perennial herb in the Amaryllidaceae family, though you would never guess it from the way most gardeners treat it.[5] In practice, it is almost always grown as an annual because harvesting the bulb means lifting the whole plant. I have left cloves in the ground over mild winters and watched them reliably re-sprout the following spring, which confirms the perennial nature, but if maximum bulb size is the goal, growing it as an annual is the right call. Cultivated garlic propagates almost exclusively through its cloves, a consequence of its long history under human selection.[6] That clonal nature is what connects every bulb you plant in your garden to an unbroken vegetative lineage stretching back to the Central Asian steppe. Today, California produces more than 90% of U.S. commercial garlic, a figure that puts in sharp relief just how far this plant has traveled from its origins as a wild, weedy Allium on a windswept plateau.[7]
Visual Characteristics
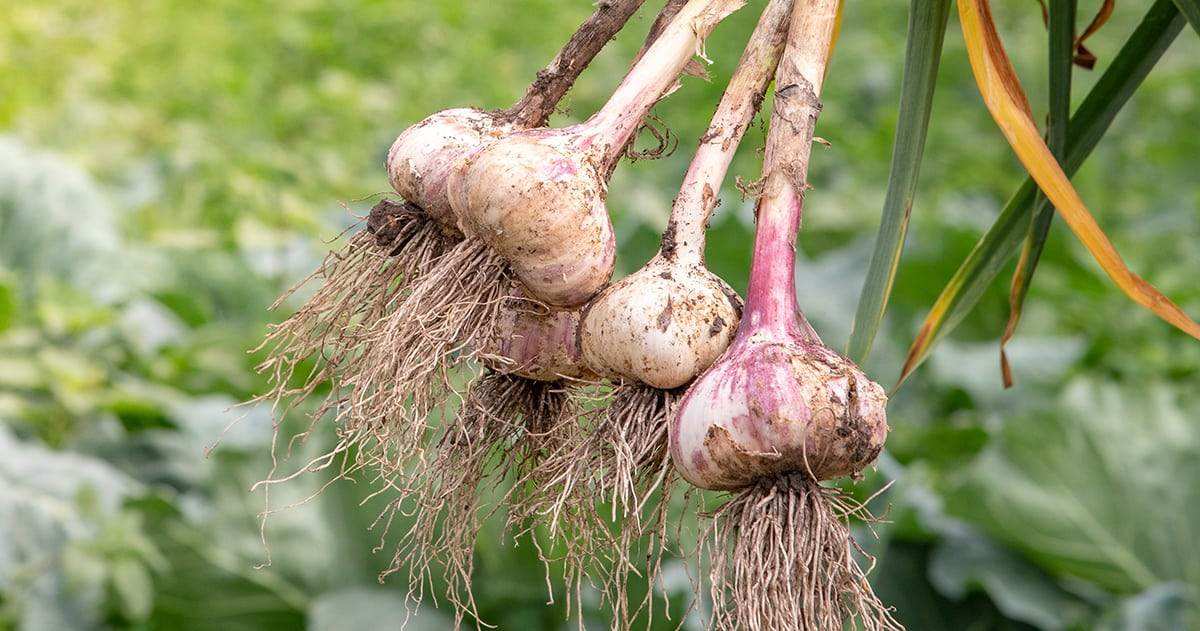
In the garden, garlic is easy to overlook until you know what you are looking for. Plants emerge as a cluster of flat, gray-green, strap-like leaves, typically reaching 12 to 24 inches tall, with a slightly waxy surface that sheds water nicely.[8] The root system is fibrous and surprisingly shallow, anchored at the basal plate of the bulb rather than any kind of taproot, which is worth knowing when you are weeding around it.[9] Below ground, the compound bulb holds 10 to 20 cloves wrapped in a thin, papery tunic that ranges from white to pinkish-brown depending on cultivar.[5]
On hardneck varieties, a flowering scape emerges in late spring, starting as a coiled loop before it straightens toward the sky. I genuinely look forward to this moment every year; those curling scapes look almost architectural before they unfurl, and harvested young they are one of the more underrated vegetables in a spring garden. The scape terminates in a small umbel of pale, star-shaped flowers surrounded by bulbils.[8] Softneck types skip the scape entirely, which is part of why they dominate supermarket shelves. If you ever need to confirm a plant's identity in the field, just crush a leaf. That immediate, unmistakable sulfur hit from allicin and related compounds is definitive, faster than any field guide.[10]
Traditional and Cultural Uses
Garlic moved from its Central Asian homeland into the broader ancient world with remarkable speed, carried along trade networks that would eventually become the Silk Road and reaching Mediterranean, East Asian, and African civilizations by roughly 2000 BCE.[11] Egyptian records place it on the tables of pyramid laborers and inside royal tombs; actual garlic bulbs were recovered from Tutankhamun's burial chamber, and the Ebers Papyrus from around 1550 BCE lists it in 22 separate medicinal formulas covering everything from tumors to parasitic infections.[12][11]
Greek and Roman physicians took it equally seriously. Hippocrates documented more than 60 uses for garlic, and Roman commanders reportedly mandated it for soldiers as a health and stamina measure.[11] Across Asia, the picture is similar. The Chinese Shennong Bencao Jing classified garlic as a superior herb for digestion, detoxification, and parasites, drawing on traditions reaching back to at least 2000 BCE,[13] while Ayurvedic texts like the Charaka Samhita praised it for vitality, respiratory health, and balancing Vata.[14]
Medieval Europeans leaned into the folklore side, hanging garlic at doorways against vampires and evil spirits. I find that story charming, but what sits beneath it is real: garlic was one of the most consistently used protective plants across cultures, valued in African folk medicine for wounds and malaria, in Unani traditions for hypertension, and in Latin American households as a tea for colds.[14] That consistency across otherwise unconnected healing traditions says something significant about what people observed this plant actually doing. The sustainability picture today is more complicated. Intensive monoculture garlic farming strains soil health, consumes heavy water inputs, and depends on pesticide regimes that would have been unrecognizable to any of those ancient healers.[15] After seeing soil compaction and fertility loss firsthand in test plots I managed under conventional inputs, I now source my seed garlic exclusively from small, diversified farms. The history of this plant deserves better than monoculture.
Fun Facts About Garlic
Sumerian cuneiform tablets dating to around 2600 BCE record garlic in medical recipes for fever and bites, placing it firmly in the human pharmacopoeia long before written history was common. Each compound bulb contains 10 to 20 individual cloves, and every one of those cloves is a genetically identical clone capable of becoming a whole new plant, with bulb weights varying considerably based on climate and day length.[16] Hardneck types need cold vernalization to form proper bulbs, which is why they thrive in northern gardens, while softneck varieties skip that requirement and handle milder winters far more gracefully.[17]
After growing garlic for years, I still smile when the first scape emerges coiled like a green snake in spring. What surprises many people is how physiologically tough this plant is at the cellular level; garlic activates antioxidant enzymes and stress-response genes in the face of drought, salinity, and temperature swings, accumulating protective compounds that help it survive conditions that would flatten less adapted crops.[18] That resilience is baked into its Central Asian heritage, and it is a big part of why a plant domesticated on a harsh mountain steppe eventually ended up in nearly every cuisine and medicine tradition on earth.
Garlic Varieties and How to Source Them
Hardneck vs Softneck Garlic: Key Differences and Cultivar Examples
Every garlic decision starts with one question: hardneck or softneck?[19][20] The most tangible difference is the scape, that curling central flower stalk that hardneck varieties throw up in early summer. If you grow leeks or green onions, you know what a flower stalk looks like; the garlic scape is similar but curlier and far more useful in the kitchen. I harvest mine for pesto and stir-fries, and the moment they start to curl is also my signal that bulb harvest is about six weeks out. Softneck varieties skip this step entirely and instead put their energy into producing 10 to 20-plus smaller cloves arranged in concentric rings, while hardnecks form 4 to 12 larger cloves in a single layer around a woody central stem.[19][20][21]
The trade-offs from there are real and practical. Hardnecks thrive in colder climates (USDA zones 3–7), deliver bolder, more complex flavor with higher allicin potential, but store for only 3 to 7 months and yield roughly 1 to 1.5 pounds per pound of planting stock.[20][22][23] Softneck types suit warmer zones (5–10), taste milder and sweeter, store 6 to 10 months, and yield closer to 1.5 to 2 pounds per pound planted.[24][23][20] That milder flavor and longer shelf life is exactly why softnecks dominate commercial production. Skin color across both types ranges from white to purple, red, and tan depending on cultivar, and mature bulbs typically measure 2 to 3 inches across.[25]
A few named cultivars illustrate the range far better than broad categories can. 'Spanish Roja,' a hardneck Rocambole, forms 8 to 10 cloves with a bold, spicy bite and keeps 5 to 7 months.[24][26] On the softneck side, 'Inchelium Red' (Artichoke type) packs 10 to 20 rich, mellow cloves and stores 9 to 10 months, while 'Wessex' offers 8 to 12 mild cloves with a 6 to 8 month window.[24][26] I always label every row at planting because hardneck and softneck seedlings look nearly identical once they're up, and mixing them up by harvest time is a genuinely frustrating mistake.
USDA and university extension services recognize over 100 cultivars total.[5][24] Breeding programs are also expanding these options by crossing cultivated garlic with wild relatives like Allium longicuspis and A. roylei to develop lines with better nematode and disease resistance; some heirlooms like 'German White' already show partial resistance to root-knot nematodes.[27][28][29] For a regenerative grower, that's not a minor footnote; it's the difference between a planting stock that holds up over time and one that requires constant intervention.
Where to Buy Garlic Bulbs: Reputable Suppliers, Pricing, and Regulations
Finding garlic planting stock is genuinely easy. U.S. cultivation covers more than 50,000 acres annually, with California supplying roughly 90% of domestic production, and bulbs are available from seed companies, nurseries, and garden centers in all 50 states.[30][5] For variety selection and disease-free quality, I consistently reach for specialists like Filaree Garlic Farm, Johnny's Selected Seeds, Baker Creek, and Southern Exposure Seed Exchange.[31][32][33] Burpee and Gurney's are solid mid-range options, and big-box stores like Home Depot and Lowe's carry more affordable mass-market packs if budget is the priority.[34]
Expect to pay $10 to $30 per pound for planting stock, with Johnny's running around $22.50 per half-pound, Burpee pricing five bulbs at $19.95, and big-box packs landing between $8 and $15.[34][31][35] I've learned the hard way that bargain bulk packs from unknown sources can carry latent white rot; bulbs from Filaree or Johnny's have consistently performed better in my beds. Always buy certified disease-free stock, and only source from USDA-inspected or state-inspected suppliers.[36][37] Some states, Hawaii among them, restrict garlic imports outright to prevent white rot and nematodes from establishing in local soils, so check your state's phytosanitary rules before ordering from out of state.[36][38] Most suppliers ship in autumn, September through November, to align with cold-dormancy requirements.[39][40] Once you've settled on a type that suits your climate and storage needs, getting quality bulbs to your door is about as straightforward as this crop gets.
Garlic Propagation and Planting Guide
If you've ever wondered why garlic seed isn't sold at garden centers alongside tomato and pepper packets, the answer comes down to how this crop has evolved under thousands of years of human selection. Garlic is propagated from cloves, almost universally, and that's not just convention. It's biology, practical economics, and accumulated agricultural wisdom all pointing the same direction.
Vegetative Propagation: Why Cloves Dominate Garlic Growing
Separating a bulb into individual cloves and planting them is how home gardeners and commercial growers alike have sustained this crop for millennia.[41][42] Each clove is a genetic clone of the parent plant, which means flavor, bulb architecture, and yield characteristics come out consistent and predictable. Planted in fall, a clove produces a harvestable bulb in 8-10 months.[43] That timeline alone makes cloves an almost unbeatable starting point.
The deeper reason seed isn't an option for most growers is that most cultivated garlic is sterile or effectively triploid. When plants do send up flower stalks, they typically produce bulbils, those small aerial clovelets nestled in the umbel, rather than viable pollen or seed.[6][44] In ten years of growing garlic, I've had only one variety set a small handful of actual seeds; every other plant just offered me bulbils or nothing at all. The centuries of clonal selection that gave us 'Music' and 'Spanish Roja' also quietly selected out reliable sexual reproduction. Tissue culture is used in research settings to produce disease-free stock or multiply rare genotypes, and grafting onto onion rootstock has been explored experimentally for Fusarium resistance, but neither method is something you'll encounter outside a specialized nursery or a plant pathology lab.[43][45] For the rest of us, cloves are the method, full stop.
Soil and Site Requirements for Successful Garlic Establishment
Garlic's roots are fibrous and relatively shallow, reaching 15-30 cm, which means the quality of the top foot of your soil determines most of what happens underground.[46] Start with a soil test. I say this from painful experience: I once lost a bed to what turned out to be aluminum toxicity in soil that had been heavily mulched with pine needles over several seasons, slowly dragging pH down into territory where micronutrients became problematic. A test costs a few dollars and saves you that kind of frustration. Garlic wants a pH of 6.0-6.8 for peak performance, tolerating a wider range of 5.5-8.0 but producing noticeably smaller bulbs and more disease issues outside the sweet spot.[46][42] If you're below 6.0, lime brings it up; if you're above 7.0, elemental sulfur brings it down.[47]
The texture you're aiming for is a well-drained loamy or sandy-loam with 3-6% organic matter.[47][48] Work 2-4 inches of compost into the top 6-8 inches before planting, but skip fresh manure, which brings pathogens that love a wet fall bed.[47] Compaction is the enemy here, more than for onions or shallots in the same guild, because garlic's tight bulbing structure needs room to expand laterally. Waterlogged soil leads to soft, foul-smelling roots and opens the door to Fusarium and basal rot faster than almost any other stress factor.[46][49] If you're gardening on heavy clay, raised beds or containers with a minimum depth of 8-12 inches and a free-draining mix will solve most of those problems before they start.[50]
On light, there's no flexibility: garlic needs 6-8 hours of direct sun daily.[51][46] Shade produces etiolated, pale leaves and bulbs that never develop properly. Garlic is a sun crop in the same unapologetic way that tomatoes are, and it shouldn't be sited as an afterthought under the canopy edge of a fruit tree.
Planting Technique, Spacing, and Timing
Fall planting is the decision that determines next summer's harvest more than any other single factor. Set cloves into the ground 4-6 weeks before the soil freezes, which in most temperate gardens means October through November.[46][52] That cold period, vernalization, is what signals the plant to build a proper multi-cloved bulb rather than a single round. After several seasons of trialing both timing windows, I've seen fall-planted beds consistently out-yield spring starts by 30-50% in bulb size. Spring planting is possible in very cold climates where fall establishment fails, but it should be the backup plan, not the default.
Place each clove with the pointed end up, 1-2 inches deep.[46] Planting too shallow invites heaving in freeze-thaw cycles; too deep delays spring emergence noticeably. After adjusting my own technique over a few seasons, I've settled on 2 inches as the sweet spot for my conditions, with a bit of extra depth on sandier soils that drain heat faster. For spacing, hardneck types do best at 5-6 inches within rows, softneck types at 4-5 inches, with 12-18 inches between rows in a home garden setting.[46][53] Tighter spacing increases total yield per square foot but reduces individual bulb size and restricts airflow, which matters more in humid climates where foliar disease pressure is higher.[54][55]
Once the bed is planted, apply 2-4 inches of straw or shredded leaf mulch immediately.[56][42] Mulch moderates soil temperature through winter, suppresses the weeds that would otherwise compete hard with garlic's shallow roots, and retains enough moisture to support early root establishment before the ground freezes. It's one of those small steps that pays back several times over by spring.
True Seed Propagation and Germination Timeline
On the rare occasion that garlic does produce viable seeds, they are small black angular structures 2-3 mm long, recognizable by a whitish hilum, and they behave as orthodox seeds that store reasonably well at cool temperatures and low humidity.[57][58] Getting them to germinate is another matter. True garlic seed requires 4-6 weeks of cold, moist stratification at 4-10°C to break dormancy, after which germination happens at 15-20°C but typically comes in below 50% even with optimal conditions; scarification or gibberellic acid treatment can help.[59][60]
Even if germination succeeds, seedlings take 2-4 years to produce a harvestable bulb, compared with 8-10 months from a planted clove.[44][46] Seedlings also diverge genetically from their parents in ways that are impossible to predict, which is useful for breeders developing new cultivars but a real problem if you want to replicate a variety you love.[44] I label trial rows of seed-grown alliums obsessively for exactly this reason: a two-year-old garlic seedling looks disconcertingly like a weed, and it's easy to lose track of what you planted where. True seed work is a rewarding experiment for the curious grower, but it belongs in the category of long-term plant breeding rather than the annual kitchen garden cycle that most of us are running.
Garlic Care Guide and Seasonal Maintenance
Garlic is technically a perennial, capable of surviving in the ground across multiple seasons without being lifted.[61][1] In practice, most gardeners treat it as an annual, and for good reason: harvesting at the end of the season gives you the largest, best-formed bulbs. Leave a clove in the ground and it'll come back, but the results are rarely worth the wait. Every care decision you make, from how much water you give in May to when you stop fertilizing in June, flows from understanding where the plant sits in its seasonal arc.
Seasonal Rhythm and Growth Cycle
Fall planting isn't just a tradition. Garlic needs roughly 40-45 days of temperatures below 45-50 °F to trigger proper bulb development, a process called vernalization.[62][63] Think of winter not as something your garlic merely survives, but as something it genuinely requires. Come spring, lengthening days and warming temperatures trigger the vegetative surge, and hardneck varieties will send up a flower stalk called a scape about seven to nine months after fall planting.[42] That scape is your signal that bulbing is underway. Finally, as day length peaks in early summer, the plant puts everything it has into swelling the bulb below ground, a response to long days and warmth.[56][9]
Watering Needs and Irrigation Schedule
During active vegetative growth, aim for about 1 inch of water per week, delivered as deep, infrequent irrigations that let the soil surface dry slightly between sessions.[46][64] The full seasonal picture looks like this: young plants need just 0.5-1 inch weekly, established plants in vigorous spring growth want 1-1.5 inches, and once bulbing begins you taper back to 0.5-1 inch every 10-14 days. Stop watering entirely for the final 2-3 weeks before harvest.[65][66] That dry-down period directly improves storability, so don't skip it.
Garlic can handle short dry spells during early vegetative growth, but water stress during bulbing translates directly into smaller bulbs and reduced yield.[67][68] Watch for wilting that recovers overnight, dry soil 4-6 inches down, and browning leaf tips as signs you've gone too long between irrigations. On the other side, yellowing leaves, mushy roots, and soft bulbs signal overwatering; well-drained soil is non-negotiable because waterlogged conditions dramatically increase disease risk.[42][46] I've found that a good 3-4 inch layer of straw mulch cuts my irrigation frequency in half once the plants are established, which is especially useful during a busy spring.
Sunlight and Temperature Requirements
Garlic wants full sun, at least 6-8 hours of direct light daily.[53][69] Shade it and you squander every hour of careful fall planting and winter vernalization. Vegetative growth is most vigorous between 55-75 °F; push above that range and you risk leaf scorch, tip burn, and wilting, particularly on young plants.[70][46] In hotter climates, afternoon shade, consistent moisture, and mulch do the mitigation work. Humidity matters too: garlic prefers drier air, and persistently humid conditions set the stage for fungal problems.[71]
Feeding and Nutrient Management
Garlic is a moderate to heavy feeder with an unusually high demand for potassium, which is what actually drives bulb size and density.[72][73] A split fertility approach works best: emphasize phosphorus and potassium at planting to build roots and set the stage for bulbing, supply nitrogen during the spring vegetative surge, then cut nitrogen back well before harvest to avoid the twin problems of delayed maturity and smaller bulbs.[74][75]
Leaf color is your mid-season diagnostic. Yellowing of older leaves from the tips points to nitrogen deficiency; purple or reddish discoloration on leaf margins, especially in heavier clay soils in my experience, usually indicates a phosphorus shortage with poor root development underneath; marginal yellowing and weak stems suggest potassium is low. Interveinal chlorosis on older leaves means magnesium. Too much nitrogen shows up as dark, lush foliage that stays green too long and resists maturation.[76][77]
For organic systems, compost and well-rotted manure build baseline fertility, bone meal covers phosphorus, and wood ash or greensand supplies potassium. I've noticed genuinely plumper bulbs in beds where I worked wood ash into the soil the previous fall. Side-dress with a nitrogen source 4-6 weeks after spring emergence, then hold back.[78] Soil testing every 2-3 years keeps you from guessing.
Frost Tolerance and Winter Protection
Dormant garlic bulbs are remarkably tough, surviving temperatures down to -15 °F to -30 °F when properly mulched and rated across USDA zones 3-9.[46][42] Young shoots, though, are a different story entirely; temperatures below 28 °F can cause water-soaked lesions, tip browning, and in bad cases real yield loss.[46][79] I learned this the hard way when an unexpected late-spring freeze caught a small bed of newly emerged shoots I'd left uncovered. That patch never fully recovered that season. Now I keep row covers within reach until the second set of true leaves is solidly up.
The strategy is straightforward: plant in fall to get roots established before the ground freezes, apply 4-6 inches of straw or leaf mulch after the soil freezes to moderate temperature swings, and choose hardneck varieties for colder zones since they're generally more cold-hardy than softnecks.[72][53] South-facing slopes and windbreaks are worth considering too. And remember: that cold is doing something useful, not just something the plant tolerates.
Pruning, Maintenance, and Sustainable Practices
In spring, once hard frost danger is past, pull back the mulch to let the soil warm. On hardneck varieties, watch for scapes to emerge. Cut them when they form a loop, ideally the moment the curl appears rather than waiting for a full spiral. I shifted to that earlier timing after a few seasons of experimenting, and bulb size improved noticeably. The scapes don't go to waste either; they're mild, garlicky, and excellent sautéed or tossed into a stir-fry.[46][42] I actually mark my scape rows on the calendar now so I don't miss the window.
Beyond that single annual cut, garlic's maintenance is mostly about what you do between seasons. A 3-4 year rotation away from other alliums is the single most effective thing you can do for long-term soil health and disease prevention.[78][80] Rotating through legumes or brassicas before returning garlic to a bed has kept white rot completely out of my garden for years. Reduced tillage, consistent mulching for weed suppression, and regular soil testing round out a low-drama maintenance system that rewards patience over fuss.[53]
When and How to Harvest Garlic
After 240-300 days in the ground,[81][82] the moment of harvest can feel anticlimactic from the surface. The plant doesn't announce itself. You have to read it. That skill, knowing when the bulbs are actually ready, is what separates a pantry full of firm, pungent heads from a disappointing tangle of split or underdeveloped ones.
Recognizing Harvest Readiness
I watch leaf color far more than the calendar, because the actual week shifts depending on spring temperatures and rainfall. The reliable cue is when 40-50% of the lower leaves have turned brown and dried while the upper leaves are still green; bulbs at that stage should be firm, 2-3 inches across, with skins that have filled in around the cloves.[82][83][84] For most of temperate North America, that puts peak harvest somewhere between June and August.[85] I've started pulling one test bulb a week before I think the bed is ready, just to confirm the skins have formed properly. Garlic harvested too early has underdeveloped wrappers that split open in storage; too late, and the cloves start separating in the soil.
Variety type matters here. Hardneck types typically come ready 60-90 days after scape emergence, while softnecks take 90-120 days from that same reference point.[86][85] That difference shapes not just when you harvest but how long you'll be eating from the crop.
Harvesting Technique and Post-Harvest Curing
Choose a cool morning, ideally below 80°F, when the soil is moist but not waterlogged.[26] Push a garden fork into the soil 6-8 inches away from the plant and lever the bulb up gently rather than pulling from the stem.[26][87] Bruised bulbs develop soft spots within a couple of weeks of curing; I've learned that the 6-8 inch buffer isn't overcautious, it's the difference between a head that stores for months and one that goes off before winter.
Curing converts those fresh bulbs into reliable kitchen staples. Hang or lay them in a well-ventilated spot at 68-80°F with around 60-70% humidity for 2-4 weeks, until the necks are fully dry and the outer skins are papery.[88][89] Once cured, brush off soil, trim roots to about half a centimeter, and cut tops to 2-5 cm before moving to storage.[88] I keep mine in mesh bags in a cool, dark spot; I never use plastic bags because trapped moisture invites mold within days.[23] Skip the refrigerator too, cold temperatures trigger sprouting.[23][90]
Flavor, Texture, and Storage Life of Fresh Garlic
A mature garlic bulb -- typically 2-3 inches across and packed with individual cloves -- is edible in multiple forms at harvest.[91][46] Raw, it's sharp and sulfurous with a lingering burn; that pungency is allicin and related compounds doing exactly what they evolved to do.[92][93] Roasting breaks all that down through Maillard reactions, converting the sharpness into something sweeter and nuttier with a soft, spreadable texture.[92][94] A roasted head is honestly my go-to for anyone in the family who claims not to like garlic; it's a completely different experience.
How long you can enjoy the harvest depends heavily on which type you grew. Softneck varieties store 6-12 months under cool, dry, dark conditions; hardnecks typically give you 4-8 months before quality starts declining.[95] My softnecks routinely last well into the following spring, while the hardnecks are best prioritized through early winter. Knowing that at harvest time helps you plan which heads to use first and which to save.
Garlic Preparation and Uses
Culinary Uses and Flavor Transformations of Garlic
Most people think garlic begins and ends with the bulb, but if you're growing your own, you're sitting on a lot more than just cloves. The scapes, those curly flower stems that hardneck varieties push up in early summer, are tender and bright when harvested young, somewhere between a chive and asparagus in texture.[96][5] I blend mine into spring pestos before the bulbs are even close to ready. The leaves work like chives or green onions in any dish where you want a softer garlic presence, and the flowers add a milder, almost delicate garlic note as an edible garnish.[91]
The flavor shift between raw and cooked garlic is dramatic, and it's worth understanding why. Crushing or chopping a clove triggers the release of allicin, which gives the fresh clove that sharp, sulfurous bite.[97] Once you apply heat above 60°C, allicin breaks down into gentler compounds that read as sweet, nutty, and mellow.[98] Roasted garlic, where whole heads go into a low oven until they're soft and caramelizable, is the most extreme version of this transformation. I learned early on that the window between fragrant and burnt in hot oil is about thirty seconds; charred garlic turns bitter fast, and no amount of other ingredients will save a dish that opens with that note.
Garlic anchors cuisines across the globe because it pairs so willingly with nearly everything: beef, lamb, poultry, seafood, tomatoes, mushrooms, potatoes, and herbs like parsley, rosemary, and basil all respond well to it.[99] Mediterranean aioli, Asian stir-fry marinades, Latin American adobos -- each cuisine has its own technique for extracting the character it wants.[99][100] Garlic toast recipes and garlic bread recipes typically lean on butter and heat to mellow the bite; garlic mashed or whipped potato recipes benefit from either roasted cloves for subtle sweetness or raw garlic pressed in at the end for real punch. A honey garlic chicken recipe, by contrast, relies on that tension between pungency and sweet reduction.
Fermentation takes the transformation further still. Black garlic, produced by aging whole bulbs under controlled heat and humidity over weeks, loses nearly all its sharpness and develops a balsamic, deeply savory umami flavor through bacterial action on alliin compounds.[101] It's not just mellowed garlic -- it's a genuinely different ingredient, and it behaves that way in the kitchen.
Medicinal Preparations and Dosages
There's a real difference between the garlic you cook with and the garlic you take therapeutically. A few cloves in your honey garlic chicken recipe are wonderful and will give you mild, everyday support, but the clinical trials for cardiovascular and immune outcomes typically use 600 to 900 mg of standardized garlic powder extract standardized to 1.3% allicin, or the equivalent of 2 to 5 grams of fresh garlic daily, divided into two or three doses.[102][103][104] Growing your own means you control freshness, which matters for allicin content, and I do keep a jar of crushed raw cloves in local honey through winter for sore throat support. For anything more targeted, though, I reach for a standardized powder where the dosage is actually measurable. The health benefits section covers the underlying research in detail; this is just about knowing which form of garlic does what.
Non-Food and Historical Uses
Garlic's non-culinary history is modest but worth a brief mention. The skins and leaves have been used historically for cordage and natural dyes, and I've played around with garlic skin dye on wool with genuinely lovely warm tan results.[96] As an ornamental, garlic is charming in an herb bed, especially when the scapes curl up in spring, though its showier Allium relatives get more attention in the flower garden. These uses are footnotes to garlic's real story, which stays firmly in the kitchen and the medicine cabinet.
Garlic Health Benefits and Medicinal Uses
Most of what garlic can do for your body traces back to a single biochemical event: you crush a clove, and within seconds the enzyme alliinase converts alliin into allicin, a reactive organosulfur compound that didn't exist in the intact tissue a moment before. That's the whole story, really. Everything else, the antimicrobial action, the cardiovascular effects, the anti-inflammatory data, flows downstream from that reaction. Understanding it changes how you grow garlic and how you use it.
Key Phytochemicals in Garlic: Allicin, Alliin, and Organosulfur Compounds
Fresh garlic cloves hold alliin at roughly 9-25 mg/g, which converts on tissue damage to allicin at 2-6 mg/g.[105][106][107] The bulb is the richest source, with total organosulfur compounds at 10-50 mg/g dry weight, considerably higher than the leaves.[108][109] The flavonoids quercetin and kaempferol, along with phenolic acids like ferulic and caffeic, add a secondary layer of antioxidant and anti-inflammatory activity on top of the sulfur chemistry.
After years of growing hardneck varieties alongside commercial softneck bulbs, I can tell you the difference in aroma at harvest is striking. That's not just anecdotal: hardnecks typically carry 20-30% higher allicin concentrations than softnecks, and soil sulfur levels, harvest timing, and climate all shift those numbers further.[110][111][112] Bulbs pulled at 70-80% maturity, from sulfur-adequate soil, in moderate temperatures accumulate the most. Grow them right and you're literally growing a more potent medicine.
Heat is allicin's enemy. Boiling or high-heat cooking destroys 80-90% of it, and garlic powder made with high heat fares no better.[113][114] My habit is to crush or mince cloves and let them sit at room temperature for a few minutes before they go anywhere near a pan; alliinase is activated and allicin forms fully within minutes, and some of it survives brief low-heat cooking even if it wouldn't survive a hard boil. For raw applications like salad dressings, the activity is fully intact. Low-temperature drying below 60°C preserves 50-70%, which is worth knowing if you're dehydrating your own harvest.
Evidence-Based Medicinal Benefits
The antimicrobial data on garlic is some of the most mechanistically convincing in the herb literature. Allicin disrupts bacterial cell membranes, reacts with thiol groups in essential enzymes, and shows measurable activity against Staphylococcus aureus, including MRSA strains, as well as Candida albicans.[115][116][117] In vivo mouse models have shown reduced bacterial load in systemic infections, which moves this beyond petri-dish speculation.[118] I wouldn't suggest anyone swap antibiotics for garlic paste, but the underlying chemistry here is real.
Cardiovascular support is where the human clinical data is strongest. Meta-analyses of clinical trials show garlic supplementation reduces systolic blood pressure by approximately 4-10 mmHg in people with hypertension, lowers LDL cholesterol by 5-15%, and reduces platelet aggregation by 20-30%.[119][120][121] Those numbers aren't dramatic enough to replace medication, but for someone managing borderline cardiovascular risk with lifestyle tools, they're meaningful. Human trials and meta-analyses also show reductions in C-reactive protein and malondialdehyde alongside increased glutathione, markers pointing to genuine systemic anti-inflammatory and antioxidant effects.[122][123]
Beyond the cardiovascular story, the evidence gets more preliminary. Preclinical studies show garlic compounds including ajoene and diallyl sulfide can induce apoptosis in cancer cell lines and inhibit tumor proliferation. Epidemiological data also associate higher garlic consumption with reduced gastrointestinal and colorectal cancer risk.[124][125][126] Animal and in-vitro studies also point to hypoglycemic effects, enhanced NK cell activity, and neuroprotective benefits against oxidative stress.[1] Promising, but still observational or preclinical for the most part. For practical supplemental use, fresh crushed garlic maximizes allicin for acute applications, while aged garlic extract supplies stable S-allyl cysteine better suited to longer-term cardiovascular or antioxidant support; typical extract doses range from 600-1,200 mg daily.[127][128]
Nutritional Profile of Garlic
A single raw clove is about 3 grams, and per 100 g raw garlic delivers 149 kcal, 6.4 g protein, 33 g carbohydrates, and genuinely impressive micronutrient density: 73% of the daily value for manganese, 62% for vitamin B6, and 52% for vitamin C, alongside meaningful selenium, calcium, and potassium.[129] Nobody eats 100 grams of garlic at a sitting, of course, but even one or two cloves chopped into a meal contributes real B6 and manganese alongside those organosulfur precursors. That combination is what makes it useful rather than just flavorful.
Cooking changes the picture significantly: boiling reduces vitamin C and thiamin content, and as covered above, destroys the bulk of allicin.[130] Garlic powder is calorically denser at 331 kcal/100 g but loses virtually all its vitamin C and most of its bioactive sulfur activity.[131] My own approach is simple: a clove minced raw into a finished dish or salad gives you the nutritional payload and the allicin without requiring any special regime.
Safety Considerations and Side Effects
Culinary use at 1-3 cloves daily (roughly 4-12 g) is very safe for most adults.[102][127] The familiar side effects, heartburn, flatulence, breath and body odor, are more pronounced with raw garlic and high-dose supplements, and most people manage them by eating garlic with food rather than on an empty stomach.
Where it gets genuinely important is drug interactions. Garlic inhibits platelet aggregation with enough consistency across studies that I tell clients on warfarin, aspirin, or other anticoagulants to treat medicinal-dose garlic like another medication and have a direct conversation with their doctor.[132][133][134] The platelet data is too consistent to treat casually. Anyone scheduled for surgery should discontinue high-dose supplemental garlic at least two weeks before the procedure.
Pet toxicity is genuinely under-appreciated by gardeners, and it comes up more than you'd think. Garlic is toxic to dogs and cats at as little as 5 g/kg body weight, causing oxidative damage to red blood cells and hemolytic anemia.[135][136] Kitchen scraps in the compost, fallen cloves during harvest, even cooking water poured outside: I keep all of it away from my dogs. Garlic stored in oil at room temperature also poses a botulism risk and requires acidification or refrigeration.[137]
High-dose medicinal use in pregnancy lacks solid human safety data and carries a theoretical risk of uterine stimulation; it's best avoided beyond normal culinary amounts.[102] Applied topically, fresh garlic can cause contact burns or dermatitis, and rare anaphylactic reactions have been reported.[138] Finally, if you're wildcrafting anything that resembles garlic, crush a leaf first and confirm the sulfurous scent. Death camas (Zigadenus spp.) lacks it entirely and contains alkaloids that can be lethal; the nose test is the most reliable field check a forager or gardener has.[139][140]
Garlic Pests and Diseases
There's a pleasing irony in garlic's relationship with pests and pathogens. The same sulfur compounds that make it such a useful companion plant in the garden, particularly allicin formed when tissue is damaged, give it genuine resistance against many insects and some pathogens.[141][142] But that chemistry is incomplete armor, and garlic has its own serious vulnerabilities. Understanding both sides is what lets you grow it confidently rather than anxiously.
Common Diseases of Garlic and Management Strategies
White rot is the disease I warn every new garlic grower about first. Caused by Sclerotium cepivorum, it thrives in cool, moist soils between 10 and 18°C and can persist in the ground for over 20 years, with the potential to cause total crop loss.[25][143] I maintain a strict 4 to 5 year rotation away from any Allium and have stayed clean because of it. Once it's in a bed, you're not really farming that ground for garlic again within a reasonable timeframe. The stakes don't get much higher.
Beyond white rot, garlic shows moderate to high susceptibility to Fusarium basal rot, moderate susceptibility to downy mildew and bacterial soft rot, and high susceptibility to viruses including Onion yellow dwarf virus and Garlic latent virus.[144][145][146][147] That last category is why I never replant cloves from supermarket heads of unknown provenance. Viruses accumulate silently across generations of home-saved stock, progressively reducing vigor. Starting each season with certified disease-free planting material is non-negotiable for me.
Cultivar selection gives you a real lever here. California Early and Chesnok Red carry resistance to Fusarium; Germidour and Printanor show resistance to white rot; Early Red and Inchelium Red perform better against downy mildew.[148][149] I've trialed Chesnok Red and Inchelium Red over multiple seasons and genuinely observed less Fusarium and disease pressure compared to unlabeled stock. The varieties section covers these choices in more depth, but the practical message is that matching cultivar to your local disease profile matters before you ever put a clove in the ground. Because garlic propagates clonally, genetic diversity is limited and breeding for resistance is slow work,[150][151] so cultural practices remain your strongest tools: clean stock, extended rotations, good spacing for airflow, and thorough curing after harvest to head off Botrytis and bacterial rots in storage.[152]
Insect Pests of Garlic and Natural Repellent Properties
Garlic's sulfur chemistry works differently against insects than it does against fungi. When a feeding insect damages tissue, alliin converts via alliinase to allicin, producing the volatile compounds that repel through both odor and taste.[141][153] This is why I slot garlic into guilds near my brassicas and tomatoes the same way I'd use a companion planting of marigolds, except the mechanism is more systemic and the evidence is stronger. Field trials show garlic interplanting can reduce aphid populations by up to 80% and cut onion thrips numbers by 30 to 60%.[153][154] Results vary with preparation, concentration, and environment, so I treat those numbers as a range to aim for rather than a guarantee.
Garlic itself faces moderate susceptibility to onion fly and thrips, low to moderate susceptibility to aphids, and moderate efficacy against spider mites and whiteflies.[155][156] I started scouting my beds weekly once temperatures hit the warm, dry range that favors thrips after I noticed that first silvering on the leaves one season and couldn't identify it fast enough. Early detection makes the difference. For thrips specifically, cultivar choice helps: Noordpool, Printanor, Inchelium Red, and several hardneck types show meaningfully better tolerance.[154][157]
Beyond allicin, garlic's physical structure adds another layer of protection. Thick leaf cuticles and bulb scales deter feeding and egg-laying, while beneficial rhizosphere microbes including Pseudomonas and Bacillus species induce systemic resistance through jasmonic acid-mediated pathways.[158][159] Healthy soil biology is doing real work here. An integrated approach brings it all together: rotation, sanitation, resistant varieties, biological controls, and targeted intervention only when pest pressure actually warrants it.[160][161] I've learned the hard way that overly concentrated garlic sprays can burn tender foliage badly in intense summer sun, so when I do use them I dilute conservatively and spray in the early morning. Restraint is part of the practice.
Garlic in Permaculture Design: Climate, Guilds, and Ecosystem Services
Climate Adaptation and Hardiness Zones
Garlic evolved in the cold, dry steppe of Central Asia, and that origin shapes every planting decision I make. It's technically hardy across USDA zones 3-9,[162][163][5] but that range conceals an important split. Hardneck varieties can shrug off winter lows down to -30°F or -40°F, making them the right call for zones 3-7, while softnecks are better adapted to zones 5-9, tolerating down to roughly -10°F to -20°F.[46][164][165] I learned this the hard way: I lost an entire softneck planting in a cold snap one winter because I skipped mulching, assuming the variety's warmer-climate reputation meant it could fend for itself. It couldn't. Snow cover or 4-6 inches of straw mulch is non-negotiable in zones 3-5, and row covers can add another 4-8°F of protection while raised beds handle the drainage problems that cold, wet winters create.[46][166]
Garlic needs vernalization regardless of the type you grow. This requires 4-8 weeks of temperatures between 32-45°F to trigger proper bulb formation.[46][167] In temperate gardens, fall planting delivers this naturally. In warmer marginal zones, like parts of the Southeast where I've worked, pre-chilling cloves in the refrigerator before planting is often the only way to coax a decent bulb out of the season. Bulbing itself is triggered by lengthening spring photoperiods and works best in the 50-80°F range; temperatures above 85°F during bulbing can reduce size and quality.[42] I've had good luck stretching borderline hardneck varieties one zone warmer than expected by planting on south-facing berms, which warm the soil earlier in spring and dry out faster after rain. Sulfur-rich soils and cooler climates also tend to produce more pungent, robust bulbs,[168] which tells you something about why your variety choice and site conditions are really one decision, not two.
Ecosystem Functions and Companion Planting
Here's the honest permaculture assessment of garlic: it's almost entirely a domesticated, clonally propagated crop with no significant role in wild ecosystems.[169][170][171] Most commercial and garden varieties are sterile; they don't seed into a food forest and naturalize the way a comfrey or elderberry might. If you're expecting significant wildlife habitat or nutrient cycling from garlic, it won't deliver those in the way a nitrogen-fixer or a deep-rooted dynamic accumulator would. What it does deliver is chemistry, and that's where its permaculture value gets genuinely impressive.
The sulfur compounds that give garlic its smell also make it a powerful pest deterrent. Allicin and related compounds repel aphids, spider mites, Japanese beetles, and nematodes, and produce allelopathic effects that suppress weeds and some soil-borne pathogens.[172][173] I've watched aphid pressure on roses drop noticeably when garlic grows nearby, which isn't magic, it's just allicin doing its job. As a companion plant, garlic pairs well with tomatoes, peppers, carrots, strawberries, and roses, and there's evidence it supports beneficial soil microbial communities, including mycorrhizal fungi.[174][172] One underappreciated pollinator note: if you let hardneck scapes go to flower rather than cutting them, those white to purplish umbels draw bees reliably.[175] I deliberately leave a few bolting plants in ornamental-edible borders for exactly this reason.
Forest Garden Layer and Guild Placement
In a food forest or polyculture guild, garlic belongs in the herbaceous understory. It typically tops out at 1-2 feet, with scapes occasionally reaching 3 feet,[176][5] and its bulb stays underground, so it occupies the ground layer without competing for canopy space. Slot it under fruit trees or between shrubs where it gets full sun, well-drained loamy soil with a pH of 6.0-7.0, and consistent moisture without waterlogging.[177][178] Those conditions tend to align well with the drip line of an established fruit tree, which is exactly where you want pest deterrence working hardest.
The one guild-design caution I take seriously is allelopathy. Garlic's allicin and diallyl disulfide inhibit germination and seedling growth in certain neighboring plants, and legumes are particularly sensitive.[179][180] I think of it like the black walnut problem: an incredibly useful plant in the right guild context, but one that demands intentional spacing from nitrogen-fixers like clover, beans, or lupines. Keep garlic away from the peas and beans, and it becomes one of the more strategically placed tools in a guild planner's kit. Fall planting aligns vernalization requirements with temperate seasons naturally,[178][46] so the guild works with the calendar rather than against it.
The Bulb I Never Stop Planting
I've grown garlic in heavy clay, in raised beds, in containers on a concrete patio when that was all I had. Every fall I press cloves into the soil and feel something I can only describe as continuity, like I'm doing something people have done for so long that it barely needs my participation. It doesn't, really. It just needs the cold, the dark, and a little patience. Same as the rest of us.
Sources 180
- Antimicrobial activity of garlic (Allium sativum): A narrative review ↩
- Allium sativum - Kew Science ↩
- The Origin and Domestication History of Garlic ↩
- Origin and Domestication of Cultivated Plants - FAO ↩
- Allium sativum L. - USDA PLANTS Database ↩
- Reproductive Biology of Garlic (Allium sativum L.) ↩
- USDA National Agricultural Statistics Service - Vegetables 2022 Summary ↩
- Allium sativum - Missouri Botanical Garden Plant Finder ↩
- Allium sativum - Missouri Botanical Garden ↩
- Allium sativum - Missouri Botanical Garden Plant Finder ↩
- Garlic: The Science and Therapeutic Application of Allium sativum L. and Related Species ↩
- Garlic in Ancient Egypt ↩
- Shennong's Materia Medica ↩
- Ethnobotany of Garlic in Traditional Healing Practices ↩
- Sustainability Challenges in Garlic Production ↩
- Allium sativum ↩
- Garlic Production Guide ↩
- Abiotic Stress Responses in Garlic (Allium sativum L.): A Review ↩
- Missouri Botanical Garden Plant Finder ↩
- Hardneck vs. Softneck Garlic: Cornell Cooperative Extension ↩
- Yield and Clove Arrangement in Garlic - Rodale Institute ↩
- Cold Hardiness of Garlic Varieties - Johnny's Selected Seeds ↩
- Garlic Storage Guidelines - USDA ARS ↩
- Oregon State University Garlic Varieties ↩
- Garlic Growing Guide ↩
- University of California Agriculture and Natural Resources Garlic Guide ↩
- Breeding for Stress Tolerance in Garlic Using Wild Relatives ↩
- Nematode Management in Garlic ↩
- USDA ARS Garlic Breeding for Disease Resistance ↩
- Garlic Production in the United States: 2022 ↩
- Organic Garlic Seed ↩
- Heirloom Garlic Bulbs ↩
- Seed Garlic for Sale ↩
- Garlic Bulbs for Planting ↩
- Garlic Bulbs at Home Depot ↩
- Garlic: White Rot ↩
- Phytosanitary Certificates for Plants and Plant Products ↩
- USDA APHIS Phytosanitary Import Permitting ↩
- Allium sativum - Garlic ↩
- Garlic Production Guidelines ↩
- USDA PLANTS Database: Allium sativum ↩
- Garlic Production - Penn State Extension ↩
- University of California Integrated Pest Management: Garlic ↩
- Propagation of Garlic: Current Knowledge and Future Development of Tools for Cultivar Development ↩
- Using Onion Rootstock to Improve Garlic Resilience ↩
- Growing Garlic in the Home Garden ↩
- Garlic Production in California ↩
- USDA Garlic Production Guide ↩
- Impact of Soil Physical Properties on Garlic Yield ↩
- Growing Garlic in Containers - Missouri Botanical Garden ↩
- Missouri Botanical Garden - Allium sativum ↩
- Penn State Extension - Garlic Planting ↩
- Royal Horticultural Society - Garlic Growing Guide ↩
- Growing Great Garlic: The Ultimate Guide for Home Gardeners and Small Farmers ↩
- Allium sativum - North Carolina Extension Gardener Plant Toolbox ↩
- Growing Garlic in the Home Garden ↩
- Descriptors for Allium spp. ↩
- Seed Information Database - Kew Royal Botanic Gardens ↩
- Seed Germination of Allium Species ↩
- Propagation of Garlic (Allium sativum) ↩
- Allium sativum - Wikipedia ↩
- Traditional Garlic Cultivation in Central Asia - FAO Report ↩
- Climate Change Impacts on Garlic Production ↩
- Irrigating Garlic ↩
- Garlic Production Guide - USDA Extension ↩
- Irrigation Management for Garlic - University of California Agriculture and Natural Resources ↩
- Garlic Production Guide - Drought Management ↩
- Horticulture Research - Water Stress Effects on Garlic Bulb Development ↩
- Garlic Production ↩
- USDA Plant Guide: Garlic (Allium sativum) ↩
- Royal Horticultural Society: Garlic ↩
- Garlic Production Guide - Cornell University ↩
- Nutrient Management for Garlic - University of California Agriculture ↩
- Garlic Production Guide - Cornell University ↩
- Fertilizer Recommendations for Garlic - Oregon State University Extension ↩
- Nutrient Deficiencies in Garlic - University of California Agriculture ↩
- Garlic Production Guide - Nutrient Management - Penn State Extension ↩
- Organic Production and IPM Considerations for Garlic - USDA ↩
- Frost Protection for Vegetables ↩
- University of California Integrated Pest Management: Growing Garlic in the Home Garden ↩
- Harvesting and Storing Garlic ↩
- Garlic Production Guide ↩
- Harvesting and Storing Garlic ↩
- When to Harvest Garlic ↩
- Garlic Production Guide ↩
- Allium sativum ↩
- Harvesting and Storing Garlic ↩
- Garlic Production, Harvesting and Storage ↩
- Post-Harvest Handling of Garlic ↩
- Storing Garlic Bulbs: Temperature and Humidity ↩
- Allium sativum ↩
- Flavor Chemistry of Garlic - Journal of Agricultural and Food Chemistry ↩
- Volatile Compounds in Garlic (Allium sativum L.) and Their Importance in Nutrition and Health - PMC ↩
- Effect of Cooking on the Texture of Garlic Cloves ↩
- University of Idaho Extension: Large Scale Production of Garlic in Idaho ↩
- Allium sativum - Missouri Botanical Garden ↩
- Garlic (Allium sativum) - USDA Agricultural Research Service ↩
- Garlic: Flavor Compounds - Kew Royal Botanic Gardens ↩
- Garlic in Cooking - University of California Agriculture and Natural Resources ↩
- Garlic Usage Guide - University Extension Services ↩
- Flavor Chemistry of Garlic ↩
- Garlic - NIH Dietary Supplement Fact Sheet ↩
- Allium sativum L., folium - European Medicines Agency Assessment Report ↩
- WHO Monographs on Selected Medicinal Plants - Garlic ↩
- Bioactive Organosulfur Compounds of Garlic and Garlic Products ↩
- Phytochemical Composition of Garlic (Allium sativum L.) ↩
- Organosulfur Compounds from Garlic (Allium sativum): Chemistry and Health Benefits ↩
- Flavonoids and Phenolic Acids in Garlic: Antioxidant and Health-Promoting Effects ↩
- Organosulfur Compounds in Garlic: Distribution and Bioactivity ↩
- Varietal Differences in Allicin Content: Hardneck vs Softneck Garlic ↩
- Effect of Sulfur Fertilization on Organosulfur Compounds in Garlic ↩
- Harvesting Time Influence on Garlic Bioactives ↩
- Effect of Cooking on Allicin Content in Garlic ↩
- Effect of Processing on the Bioactive Compounds in Garlic ↩
- Allicin: Chemistry and Biological Properties ↩
- Antimicrobial Mechanisms of Allicin Against MRSA ↩
- Allicin Disrupts Bacterial Membranes and Inhibits Candida albicans ↩
- In Vivo Efficacy of Garlic Extract in Mouse Sepsis Model ↩
- Effect of Garlic on Blood Pressure: A Meta-Analysis ↩
- Garlic and Cardiovascular Disease: A Systematic Review ↩
- Garlic for Cardiovascular Effects: Clinical Trial Meta-Analysis ↩
- Effects of garlic supplementation on inflammatory biomarkers: A systematic review and meta-analysis ↩
- Antioxidant effects of garlic supplementation in clinical trials ↩
- Anticancer Effects of Garlic: Preclinical Studies ↩
- Organosulfur Compounds from Garlic in Cancer Chemoprevention ↩
- Garlic and Cancer Prevention ↩
- Garlic: Usefulness and Safety ↩
- Allium sativum L., bulbus (garlic): EMA Assessment Report ↩
- USDA FoodData Central - Garlic, raw ↩
- Garlic, cooked, boiled, drained, without salt - USDA FoodData Central ↩
- Spices, garlic powder - USDA FoodData Central ↩
- Garlic and Cardiovascular Health ↩
- Garlic Supplements and Saquinavir Interaction ↩
- Herb-Drug Interactions: Garlic ↩
- Allium sativum (Garlic) Toxicity ↩
- Onion and Garlic Poisoning in Animals ↩
- FDA: Safe Practices for Garlic in Oil ↩
- Allergic Contact Dermatitis Caused by Garlic ↩
- Identifying Poisonous Plants: Death Camas vs. Wild Onion ↩
- Death Camas - Toxic Plant Profile ↩
- Garlic as an Insect Repellent in Organic Pest Management ↩
- Disease Resistance in Garlic - HortScience Journal ↩
- White Rot of Onion and Garlic - UC IPM ↩
- Garlic Diseases and Pest Management ↩
- Fusarium Basal Rot of Onion and Garlic ↩
- Downy Mildew of Onion and Garlic - CABI Datasheet ↩
- Viruses of Garlic - APSnet ↩
- Garlic Disease Management ↩
- Resistant Garlic Cultivars Review ↩
- USDA ARS Garlic Research Program ↩
- Allium sativum Breeding for Resistance ↩
- USDA Garlic Production Guide ↩
- Allicin and Pest Control: Effects on Aphids and Other Pests ↩
- UC IPM Online: Onion Thrips Management in Vegetables ↩
- Insect Pests of Garlic ↩
- Garlic Pest Management Guidelines ↩
- University of Idaho Extension: Garlic Production Guide ↩
- Defense Mechanisms in Allium sativum Against Insects ↩
- Rhizosphere Microbiome and Garlic Pest Resistance ↩
- Garlic Insect Pests and IPM - University of California Agriculture and Natural Resources ↩
- Integrated Pest Management for Onion and Garlic - Cornell University ↩
- Köppen Climate Classification - WorldClim ↩
- USDA Plant Hardiness Zone Map ↩
- Hardneck Garlic Varieties for Maine ↩
- Garlic Production Guide - Texas A&M AgriLife Extension ↩
- Winter Protection for Garlic ↩
- Growing Garlic in Warm Climates ↩
- USDA Garlic Research Overview ↩
- USDA PLANTS Database ↩
- Allium sativum - Missouri Botanical Garden Plant Finder ↩
- Kew Science - Allium sativum ↩
- Garlic as a Companion Plant: Benefits and Mechanisms ↩
- Allelopathic Effects of Garlic ↩
- Garlic in Permaculture - Permaculture Research Institute ↩
- Missouri Botanical Garden Plant Finder ↩
- Allium sativum (garlic) ↩
- Allium sativum - Missouri Botanical Garden Plant Finder ↩
- Allium sativum - RHS Gardening ↩
- Allelopathic Effects of Garlic (Allium sativum L.) on Seed Germination and Seedling Growth ↩
- Phytochemicals in Allium sativum and Their Allelopathic Potential: A Review ↩
About the Author
Farmer Noelle has been farming for over 12 years between Washington and Michigan. Her experience ranges from small-scale biointensive operations to a 40-acre CSA with over 300 members.